Saturday, September 30, 2017

UITableView Demo

I'm using Xcode 8 and Swift 3 to build this demo application I got from the book "iOS Programming - The Big Nerd Ranch Guide". The app uses a table view to display a list of items grouped into 2 sections: one for the items worth more than $50 and another one for the rest. The image below shows how it will looks like.


Below is the list of files required by this project:


The main classes involved in this project are:
UITableViewController : retrieves data from the data source to display in the table view
- UITableView : displays the data
- UITableViewDelegate : is a protocol adopted by the delegate of the UITableView object. The table view asks the delegate for information such as row's height and level of indentation and to perform some actions (managing selections and modifying header and footer) for certain events.
- UITableViewCell : is constructed and filled will data by the UITableViewDataSource and then is passed to the table view to create a row.
- UITableViewDataSource : (protocol) is a representative of the data model which provides minimal information about the table view's appearance (such as number of sections and number of rows in each section).


1. Create a single view application in Xcode


- Suppose you already created the a single view application in Xcode named Homepwner. Then in Interface Builder, delete the view controller that Xcode created by default and drag the Table View Controller from the Object Library to the Interface Builder. Here is how it looks like.


- Open Attributes Inspector and check "Is Initial View Controller" under View Controller section.

- Select the white area under the Property Cells and open Attributes Inspector. Then, change the Style in Table View Cell section to Right Detail, which corresponds to UITableViewCellStyle.value1. After that, change the Identifier to UITableViewCell.

- Select the Property Cells and open Attributes Inspector. Then, change the Style in Table View section to Grouped.

After these steps, the view controller would look like following:


2. Create data model classes


The Item class inherits from NSObject. It's because all of UIKit classes such as UIView, UITextField, and UIViewController, inherit either directly or indirectly from NSObject. If at some points you need to interface with the runtime system (or directly call Objective-C functions, which require NSObject), you would be fine. For example, the Objective-C function class_copyPropertyList() accepts NSObject object as its argument (just import this framework ObjectiveC.runtime and then you can call that function in your Swift codes).

ItemStore class is just a helper class so it doesn't have to inherits from NSObject.

Item.swift

import UIKit
class Item: NSObject {
    var name: String
    var valueInDollars: Int
    var serialNumber: String?
    let dateCreated: NSDate
    
    init(_ name: String, _ serialNumber: String?, _ valueInDollars: Int) {
        self.name = name
        self.serialNumber = serialNumber
        self.valueInDollars = valueInDollars
        self.dateCreated = NSDate()
        
        super.init()
    }
    
    convenience init(_ random: Bool = false) {
        if random {
            let adjectives = ["Fluffy", "Rusty", "Shiny"]
            let nouns = ["Bear", "Spork", "Mac"]
            
            let idx = Int(arc4random_uniform(UInt32(adjectives.count)))
            let randomNoun = nouns[idx]
            let randomAdjective = adjectives[idx]
            
            let randomName = "\(randomAdjective) \(randomNoun)"
            let randomSerialNumber = NSUUID().uuidString.components(separatedBy: "-").first!
            let randomValueInDollars = Int(arc4random_uniform(100))
            
            self.init(randomName, randomSerialNumber, randomValueInDollars)
            return
        }
        
        self.init("", nil, 0)
    }
    
    func toString() -> String {
        return "Item: name=\(name), serialNumber=\(String(describing: serialNumber)), valueInDollars=\(valueInDollars), dateCreated=\(dateCreated)"
    }
}

ItemStore.swift 


class ItemStore {
    var allItems = [Item]()
    
    init() {
        createItem(valueInDollars: 20)
        createItem(valueInDollars: 30)
        createItem(valueInDollars: 60)
        createItem(valueInDollars: 70)
        createItem(valueInDollars: 80)
        
    }
    
    func createItem() -> Item {
        let item = Item(true)
        allItems.append(item)
        return item
    }
    
    func createItem(valueInDollars: Int) -> Item {
        let item = Item(true)
        item.valueInDollars = valueInDollars
        allItems.append(item)
        return item
    }
    
    func getGreaterThan50DollarsItems() -> [Item] {
        var items = [Item]()
        for item in allItems {
            if item.valueInDollars > 50 {
                items.append(item)
            }
        }
        return items
    }
    
    func getLessThanOrEqualsTo50DollarsItems() -> [Item] {
        var items = [Item]()
        for item in allItems {
            if item.valueInDollars <= 50 {
                items.append(item)
            }
        }
        return items
    }
}

3. Implement view controller 


3.1 Create ItemsViewController.swift file


import UIKit
class ItemsViewController: UITableViewController {
    
    var itemStore: ItemStore!
    
    override func viewDidLoad() {
        super.viewDidLoad()
        
        let statusBarHeight = UIApplication.shared.statusBarFrame.height
        let insets = UIEdgeInsets(top: statusBarHeight, left: 0, bottom: 0, right: 0)
        tableView.contentInset = insets
    }
    
    override func numberOfSections(in tableView: UITableView) -> Int {
        return 2
    }
    
    override func tableView(_ tableView: UITableView, numberOfRowsInSection section: Int) -> Int {
        print("\nsection=\(section)")
        
        switch section {
        case 0:
            return itemStore.getGreaterThan50DollarsItems().count
        case 1:
            return itemStore.getLessThanOrEqualsTo50DollarsItems().count
        default:
            return 0
        }
    }
    
    override func tableView(_ tableView: UITableView, cellForRowAt indexPath: IndexPath) -> UITableViewCell {
//        let cell = UITableViewCell(style: UITableViewCellStyle.value1, reuseIdentifier: "UITableViewCell")
        let cell = tableView.dequeueReusableCell(withIdentifier: "UITableViewCell")!
        
        let items: [Item]
        switch indexPath.section {
        case 0:
            items = itemStore.getGreaterThan50DollarsItems()
        case 1:
            items = itemStore.getLessThanOrEqualsTo50DollarsItems()
        default:
            items = [Item]()
        }
        
        let item = items[indexPath.row]
        cell.textLabel?.text = item.name
        cell.detailTextLabel?.text = "$\(item.valueInDollars)"
        
        print("\n\(item.toString())")
        print("\nrow=\(indexPath.row), section=\(indexPath.section)")
        return cell
    }
}

- I overrode the numberOfSections(tableView) method of UITableViewDataSource protocol to tell the table view that there are two sections.

- The method tableView(_:numberOfRowsInSection:) tells the table view the number of rows in each section.

- The method tableView(_:cellForRowAt) constructs a cell with data for a specific row and section then returns it to the table view. Please note that if we have 2 sections and the first section has 3 rows and the second section has 2 rows, this method gets called 5 times. If the first section has 3 rows and the second section does not have a row at all, this method gets called only 3 times.

- Calling this method tableView.dequeueReusableCell(withIdentifier: "UITableViewCell") retrieves the existing UITableViewCell instance from the queue to avoid creating a new one every time the method tableView(_:cellForRowAt) is called. As all cells have the same style, we create it once and reuse it and just change the data. It saves memory. The cell was configured in step 1 and will be created and put in to queue when the application launches.

3.2 Update the table view controller's class in Interface Builder


Open Main.storyboard file and select the table view controller then open the Identity Inspector and change the Class setting under Custom Class section to ItemsViewController.


4. Construct data


Open AppDelegate.swift file and add the following lines to the method application(_:didFinishLaunchingWithOptions)


        var itemStore = ItemStore()
        let itemsController = window!.rootViewController as! ItemsViewController
        itemsController.itemStore = itemStore
        

Constructing data is not the role of ItemsViewController class so I instantiated the ItemStore in AppDelegate.swift and injected it to the itemStore property. This also respects to dependency injection principle. If the way to create the ItemStore changes, we don't have to modify the ItemsViewController class. 


Sunday, September 24, 2017

The UIButton is not responsive

I'm new to swift. My view controller has only one button. I added a target for it to handle the TouchUpInside event. It worked at first, but it became unresponsive after I made some changes to the UI. It was just like a UILabel. No matter how many times i clicked on it, nothing happened.

Then, i figured out that it was just my silly mistake. I changed its height to zero by accident, but the button still appeared in both Interface Builder and simulator. This is why I got confused. Unlike UIButton, UILablel does not appear in the simulator if its height is zero.

[LayoutConstraints] Unable to simultaneously satisfy constraints

I'm learning Swift 3 by using Xcode 8 on MacOS Sierra. My view controller has a simple button, and I created two constraints for the top space and bottom space of the button. When I launch the app in Xcode, I got the following log message.

2017-09-24 16:40:23.780953+0700 Learn Swift[31177:1017369] [LayoutConstraints] Unable to simultaneously satisfy constraints.
Probably at least one of the constraints in the following list is one you don't want.
Try this:
(1) look at each constraint and try to figure out which you don't expect;
(2) find the code that added the unwanted constraint or constraints and fix it.
(
    "<_UILayoutSupportConstraint:0x600000090770 _UILayoutGuide:0x7ff359716960.height == 0   (active)>",
    "<_UILayoutSupportConstraint:0x60000008eb00 V:|-(0)-[_UILayoutGuide:0x7ff359716960]   (active, names: '|':UIView:0x7ff359715f40 )>",
    "<_UILayoutSupportConstraint:0x6000000906d0 _UILayoutGuide:0x7ff359716b20.height == 0   (active)>",
    "<_UILayoutSupportConstraint:0x600000090720 _UILayoutGuide:0x7ff359716b20.bottom == UIView:0x7ff359715f40.bottom   (active)>",
    "<NSLayoutConstraint:0x600000090950 V:[_UILayoutGuide:0x7ff359716960]-(113)-[NextButton]   (active, names: NextButton:0x7ff359716370 )>",
    "<NSLayoutConstraint:0x6000000909a0 V:[NextButton]-(465)-[_UILayoutGuide:0x7ff359716b20]   (active, names: NextButton:0x7ff359716370 )>",
    "<NSLayoutConstraint:0x60800008d430 'UIView-Encapsulated-Layout-Height' UIView:0x7ff359715f40.height == 568   (active)>"
)
Will attempt to recover by breaking constraint
<NSLayoutConstraint:0x6000000909a0 V:[NextButton]-(465)-[_UILayoutGuide:0x7ff359716b20]   (active, names: NextButton:0x7ff359716370 )>
Make a symbolic breakpoint at UIViewAlertForUnsatisfiableConstraints to catch this in the debugger.
The methods in the UIConstraintBasedLayoutDebugging category on UIView listed in <UIKit/UIView.h> may also be helpful.
There is a conflict between the constraints i created and the constraint the system created by default for the button. The height of the view controller's view is only 568 points, which is less than the sum of the button's height (29 points), top space (113 points), and bottom space (465 points). 

According to this page, we should lower the priority of the bottom space constraint (465 points) to 999 so the system will provide the selected bottom space, which is as close as it can while still satisfying the other constraints. 


Tuesday, September 19, 2017

Unable to comment a line of code in Xcode

I'm using Xcode 8.3.3 on MacOS Sierra. I installed accidentally Xcode in ~/Downloads folder, not the Applications folder. I have been using it for a few weeks without any problems. Today, I couldn't comment a line of code. Neither using the shortcut key (command + /) nor opening Editor menu then select Cold Folder and Fold Comment Blocks worked.

I then reinstall Xcode in Applications folder and it worked.

Saturday, September 16, 2017

xcode-select: error: tool 'genstrings' requires Xcode, but active developer directory '/Library/Developer/CommandLineTools' is a command line tools instance

I'm using Xcode 8 on MacOS Sierra to develop an iOS application just for learning purpose. I run the command below to create a strings table file for a view controller class but got the error.


genstrings MapViewController.swift

I can't find Xcode in Applications directory. I don't know why as i'm new to it, and I don't want to find out now. However, I accidentally fixed it myself.

1. Open Xcode and go to Xcode preferences by pressing command + ,
2. Select Locations tab and select "Xcode 8.3.3 (8E3004b)" from the "Command Line Tools" combo box.

Thursday, September 14, 2017

My eyes got swollen after staring at Windows 8 on Macbook Pro for a few hours

I'm using Macbook Pro 13'' late 2011. I installed Windows 8 on it several months ago. I hadn't had any problems with my eyes. 

However a few days ago, I watched a movie for a few hours at night and then i went to sleep. When I woke up in the morning, my eyes got swollen. At first, i didn't think staring at my laptop long was the culprit because my eyes had been fine for months. Then, I realized that I accidentally modified the Display profile Color Management settings. 

The cause of the problem is I changed the Device Profile under Windows Color System Defaults section to Apple RGB. Switching it back to sRGB61966-2.1 solved the issue. I couldn't see the difference between those two profiles, but Apple RGB profile did hurt my eyes.


Tuesday, September 12, 2017

My iOS app does not load the UI completely

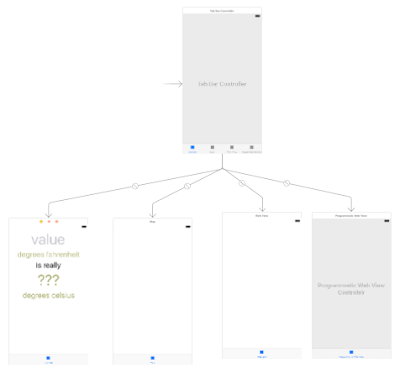
I'm developing an iOS application using Swift 3 and Xcode 8 on MacOS Sierra. I have one UITabBarController referencing 4 view controller. Here how it looks like in Interface Builder:


The first view controller below is supposed to be loaded as home screen.


But when run the project, it looked like in the image below:


And then, I looked at the Console and saw this message:

2017-09-12 16:07:40.740 Learn Swift[15358:519952] Could not load the "ConvertIcon" image referenced from a nib in the bundle with identifier "com.vathanakmao.iosapp.Learn-Swift"


Solution

It's because I don't have the "ConvertIcon" image so I remove unset the icon for the bar item of that view controller and the view controller's view loaded completely. To unset the icon, open Interface Builder and click on the bar item at the bottom of the controller. Then, open Attributes Inspector and remove the image from the Image textbox under Bar Item section.


Sunday, September 10, 2017

Highlight or annotate your favorite places on the map view using Swift 3

My demo application is for showing how to use annotations on the map view using Swift 3 (and Xcode 8). It's very simple. When you launch the app, it will show a map and the button "My Annotations". When you tap on the button, the map will navigate to your birth place. Tap on it again, it will show my favorite place called "RUPP". The image below shows how the app looks like when your launch it.


Related classes:

- MKMapView: the map view to be shown on the screen
- MKAnnotation: the info about your location such as coordinate and title
- MKAnnotationView: use it to define how the annotation (your location) looks on the map

1. Create a single application in Xcode 


Suppose you already created the application in Xcode. There should be one View Controller in Interface Builder by default.

2. Update ViewController class as following:


import UIKit
import MapKit

class MapViewAnnotationDemoController: UIViewController, MKMapViewDelegate {
    var mapView: MKMapView!
    var myAnnotationsButton: UIButton!
    private var myAnnotations = [MKAnnotation]()
    private var currentAnnotationIndex: Int = 0
    
    override func loadView() {
        mapView = MKMapView()
        mapView.delegate = self
        view = mapView
    }
    
    override func viewDidLoad() {
        initMyAnnotationsButton()
        initMyAnnotations()
    }
    
    private func initMyAnnotationsButton() {
        myAnnotationsButton = UIButton(frame: CGRect(x: 8, y:40, width: 140, height: 20))
        myAnnotationsButton.setTitle("My Annotations", for: UIControlState.normal)
        myAnnotationsButton.backgroundColor = UIColor.green
        myAnnotationsButton.addTarget(self, action: #selector(showMyAnnotations(_:)), for: UIControlEvents.touchUpInside)
        view.addSubview(myAnnotationsButton)
    }
    
    private func initMyAnnotations() {
        let myBirthPlaceAnnotation = MKPointAnnotation()
        myBirthPlaceAnnotation.title = "My Birth Place (title)"
        myBirthPlaceAnnotation.subtitle = "My Birth Place (subtitle)"
        myBirthPlaceAnnotation.coordinate.latitude = 11.5564
        myBirthPlaceAnnotation.coordinate.longitude = 104.9282
        myAnnotations.append(myBirthPlaceAnnotation)
        
        let ruppAnnotation = MKPointAnnotation()
        ruppAnnotation.title = "RUPP (title)"
        ruppAnnotation.subtitle = "RUPP (subtitle)"
        ruppAnnotation.coordinate.latitude = 11.5690
        ruppAnnotation.coordinate.longitude = 104.8907
        myAnnotations.append(ruppAnnotation)
        
        mapView.addAnnotations(myAnnotations)
    }
    
    func showMyAnnotations(_ sender: UIButton) {
        print("\nshowMyAnnotations() called")
        
        if currentAnnotationIndex == myAnnotations.count - 1 {
            currentAnnotationIndex = 0
        } else {
            currentAnnotationIndex += 1
        }
        
        mapView.showAnnotations([myAnnotations[currentAnnotationIndex]], animated: true)
    }
    
    func mapView(_ mapView: MKMapView, viewFor annotation: MKAnnotation) -> MKAnnotationView? {
        print("\nmapView(viewFor) called")
        
        let pinAnnotationView = MKPinAnnotationView()
        pinAnnotationView.annotation = annotation
        pinAnnotationView.animatesDrop = true
        return pinAnnotationView
    }

}


In initMyAnnotations() method,  we called mapView.addAnnotations(myAnnotations) method. And the addAnnotations() method calls the mapView(_:MKMapView, viewFor: MKAnnotation) method of the map view's delegate to get the instance of MKAnnotationView so the map view will know how to display the annotation. The delegate is the ViewController class in this case cause it extends MKMapViewDelegate and we set mapView.delegate to self.


Wednesday, September 6, 2017

Zoom to user's location in map view using Swift 3

In this example, there is gonna be only one view controller, and I'm gonna create a map view programmatically for the view controller's view. (I'm using Xcode 8.)

Let me show you how this app works. When you launch the app in simulator, you'll see the map as shown in the image below.


Then, when you click on the My Location button (the blue one) at the top left corner of the screen, you'll get the popup below


After you click the Allow button, the map will zoom to your simulated location as shown in the following image.


1). Create a single view application in Xcode

Suppose you already created a single view application in Xcode, in which there is one view controller in Interface Builder referencing the MapViewController class (in MapViewController.swift file)

2). Add a map view as the view controller's view. 

Open MapViewController.swift file and update it as following:

import UIKit
import MapKit

class MapViewController: UIViewController {
    var mapView: MKMapView!
    
    override func loadView() {
        mapView = MKMapView()
        view = mapView
    }
}

3). Add a button to navigate to user's location


3.1. Add userLocationButton variable to the MapViewController class:

var userLocationButton: UIButton!

3.2. Override viewDidLoad() method and initialize the button in it as below:

override func viewDidLoad() {
        userLocationButton = UIButton(frame: CGRect(x: 8, y: 8, width: 100, height: 20))
        userLocationButton.setTitle("My Location", for: UIControlState.normal)
        userLocationButton.backgroundColor = UIColor.blue
        userLocationButton.addTarget(self, action: #selector(showUserLocation(_:)), for: UIControlEvents.touchUpInside)
        view.addSubview(userLocationButton)
    }

The action parameter of the addTarget() method is of type Selector struct. The Selector struct conforms to ExpressibleByStringLiteral protocol, which means that you can write a #selector expression as a value of the action parameter. The #selector expression lets you access to the selector used to access a method or to a property's getter or setter in Objective-C runtime. The value of a #selector expression is an instance of Selector type.

According to Apple's documentation, there are four types of expressions: prefix expressions, binary expressions, primary expressions, and postfix expressions. The compiler evaluates an expression and then return a value, causes side effects, or both. The #selector expression is a subtype of primary expressions.

3.3. Add the handler method for the click event of the button

func showUserLocation(_ sender: UIButton) {
}

I added this empty method just to avoid the compile-time error because the compiler will evaluate the #selector expression above and check if the method exists.

4). Detecting user's location using Core Location framework


We need to ask for user's permission to access location services. In other words, we need to request when-in-user authorization. Here is the instruction from Apple's developer documentation.


4.1. Open Info.list file in the project directory using Property List editor and add this key "Privacy - Location When In Use Usage Description" under "Information Property List" key. Its value is an additional description that will be added in the popup "Allow 'Viewtest' to access your location while you use the app?"

4.2.  Make the class MapViewController extend CLLocationManagerDelegate and then add the following fields:
    let locationManager = CLLocationManager()
    private var userLocationButtonClicked: Bool = false


4.3. Add the below code to the viewDidLoad() method after the opening bracket.
        mapView.showsUserLocation = true
    locationManager.delegate = self

Setting mapView.showsUserLocation to true tells the map view to show the user's location on the map, but the user might not see it as they might be viewing another location on the screen.

We set the property locationManager.delegate to self to implement the handler methods for the location service events in MapViewController class.

4.4. Update the showUserLocation() method as following:

func showUserLocation(_ sender: UIButton) {
        userLocationButtonClicked = true
     
        switch CLLocationManager.authorizationStatus() {
        case CLAuthorizationStatus.notDetermined, .restricted, .denied:
            locationManager.requestWhenInUseAuthorization()
        case CLAuthorizationStatus.authorizedWhenInUse, .authorizedAlways:
            requestLocation()
        }

}

Calling locationManager.requestWhenInUseAuthorization() method the first time will display a popup to ask the user for giving the app the access to the location service. Any choice the user makes, the authorization status is sent to the location manager's delegate through this method CLLocationManagerDelegate.locationManager(_:CLLocationManager, didChangeAuthorization status: CLAuthorizationStatus).

Note that the popup won't show up next time you run the project. It seems like Xcode remembers the decision. To make it appear again, quit the simulator and remove the key "Privacy - Location When In Use Usage Description" from the Info.plist file and then run the app once. After that exit the app and add the key back and build and run the project again.

4.5. Add a handler method for the event of authorization status change

func locationManager(_ manager: CLLocationManager, didChangeAuthorization status: CLAuthorizationStatus) {
        let authStatus = CLLocationManager.authorizationStatus()
        if authStatus == CLAuthorizationStatus.authorizedWhenInUse
            || authStatus == CLAuthorizationStatus.authorizedAlways {
            requestLocation()
        }
}

private func requestLocation() {
        // check if the location service is availalbe on that device
        if !CLLocationManager.locationServicesEnabled() {
            return
        }
     
        locationManager.requestLocation()
}

The method locationManager.requestLocation() returns immediately. It requests for user's location in a separate thread. If the request is successful, it triggers the didUpdateLocations event and stops the location services automatically (to save power).

4.6. Add a handler method for the event of location update

func locationManager(_ manager: CLLocationManager, didUpdateLocations locations: [CLLocation]) {
        if userLocationButtonClicked {
            userLocationButtonClicked = false
            zoomInLocation(locations.last!)
        }
}

func locationManager(_ manager: CLLocationManager, didFailWithError error: Error) {
        if let err = error as? CLError, err.code == .denied {
            manager.stopUpdatingLocation() // cancel all pending events for getting user's location
            return
        }
}

private func zoomInLocation(_ location: CLLocation) {
        let coordinateSpan = MKCoordinateSpan(latitudeDelta: 0.001, longitudeDelta: 0.001)
       let coordinateRegion = MKCoordinateRegion(center: location.coordinate, span: coordinateSpan)
        mapView.centerCoordinate = location.coordinate
        mapView.setRegion(coordinateRegion, animated: true)
}

The mapView.setRegion() method will display the region of the user's location. MKCoordinateSpan is used to define the distance between the user's location and the area around to be displayed on the screen. The shorter distance, the closer the map zooms in.

Note that you can't detect the real location of the user using the simulator even though you enables the location services in Security & Privacy settings. The user's location is simulated by Xcode and can be modified.

Here is the complete code of MapViewController class.