The easieset way to create a bootable installation media (USB drive) for Windows 10 (or any other Operating Systems) is using UNetbootin (a free open-source software). It can run on Mac OSes, Windows, and Linux.
I downloaded and installed UNetbootin on my MacBook Air (running macOS Big Sur) and used it to create a bootable Windows 10 installation USB drive successfully. It had two options for writing the Windows 10 setup file to the USB stick: automatically downloading Windows 10 and using local ISO file of Windows 10. I tried it with my MacBook Pro, and it did boot up from that USB.
Step 1:
Open Terminal and run the following command to see the device identifier of the USB partition for storing Windows 10 installation file (which can be downloaded for free from Microsoft's website).
> diskutil list
For my case, I named the USB parition as REPAIRWIN10 and then the assigned identifier was disk2s6.
Step 2:
Start UNetbootin application and configure it as followings:
After successfully installing Windows 10 on Macbook Pro 2011, I tried to create a System Restore point but got the failure message below.
The restore point could not be created. The shadow copy provider had an error (code 0x80042306).
Many people on the net recommended starting the Shadow Copy Provider in Services (press Windows + R then type services.msc) if it isn't running or restarting it if it is already running, but that didn't fix it.
Then, I checked the logs in Event Viewer and see the description of the error code 0x80042306 below. NOTE: To start Event Viewer, open Control Panel > System and Security then click on View event logs under Administrative Tools. After that, select Event Viewer (Local) > Windows Logs > Application (or System) and create a System Restore point so that the error shows up in the logs again.
Volume Shadow Copy Service error: Unexpected error CreateFileW(\\?\GLOBALROOT\Device\HarddiskVolumeShadowCopy38...
I googled it and some people said the AppleHFS driver (from Boot Camp) is the cause of the error, and they suggested disabling it. The driver allows read-only access to an HFS drive (HFS is a Mac OS file system format). Since I didn't need to access any HFS drives, I was fine with it. After disabling it, I was able to create System Restore.
This message showed up in the middle of installing Windows 10 with VirtualBox.
Solution 1
1. Close the window and choose Power off the machine.
2. Go to Settings and set number of CPU cores to 2.
3. Start the machine again.
Solution 2
1. Press Shift + F10 to open Command Prompt and then run the following commands:
> net user Administrator /active:yes > net user /add MyName MyPassword > net localgroup administrators MyName /add > cd %windir%\system32\oobe > msoobe.exe
2. Close the Command Prompt window then select Machine > Reset to restart the virtual machine. Don't use the close button at the edge of the window of the running machine to forcefully shut it off, it might corrupt the virtual hard disk, and the virtual machine can't start. If the similar error message shows up again or it's stuck at "Just a moment" screen, just restart it again.
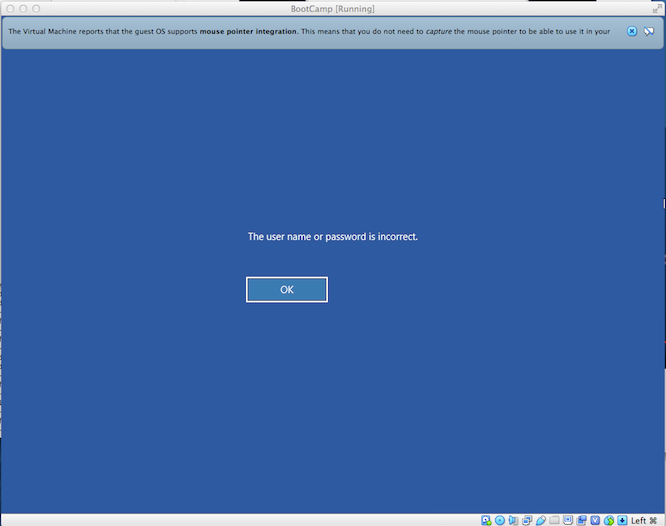
3. Click OK when the message below shows up.
then, it'll lead to Administrator login screen below. From this point forward, the error message should never appear again.
NOTE: After the installation's completed, disable the Administrator user because viruses can use the user to make change to the system files (even in Boot Sector).
- Free - Download any files faster - Integrate with browsers (using extension) - Download torrents - Download Youtube videos (in many formats or sizes) iGetter is a good alternative; it's free, supports browser integration, and can download a whole site.
It can download videos from Facebook, just clicking on the panel at the top right corner of a video without even playing. It also provides an option to download different video sizes.
My Macbook Pro 13-inch Early 2011 is in the list of Bootcamp Support for Windows 7 and Windows 8, but not Windows 10. It means that my machine would be fine running Windows 7 and Windows 8, yet some hardware might not be recognized when running Windows 10. However, later Mac models work just fine with Windows 10 because Apple provides hardware drivers (Bootcamp Support) for them.
[Method 1] HEREis how I successfully installed Windows 7 via VirtualBox. And here is some solved issues happened during installation. It worked with Windows 10 too, just using a Windows 10 ISO file instead, but sound didn't work out of the box. There were several steps to do for solving the sound issue. However, built-in keyboard and USB mouse worked fine without insalling drivers from Bootcamp Support (but I wasn't able to adjust screen brightness, keyboard backlight, and sounds using function keys).
[Method 2] I was also able to install Windows 10 using a bootable USB stick (created by Bootcamp app) but built-in keyboard, trackpad, and USB mouse weren't working when starting Windows for the first time so I couldn't even install the drivers from Bootcamp Support. I had to press and hold down the power button to shutdown the machine and start it again; then Windows did some repair tasks and rebooted the machine, and the keyboard and USB mouse started to work so I was able to install the drivers from Bootcamp Support and then Windows updates. However, sound and external monitor weren't working. Sound issue could be fixed by the steps described in the section below, but external monitor couldn't, even after installing the monitor driver and firmware updates and manually updating the graphics card's driver).
Fixing WiFi, Camera, Bluetooth, and external monitor
I got WiFi, Camera, Bluetooth, and SD card reader working using Bootcamp Support version 5.1 (intended for Windows 7 and 8 only), but I had to manually install them one by one, by clicking on their corresponding setup files located in the Broadcom and Apple folders the Bootcamp Support file. I also manually installed other drivers that came along, thinking they might be useful though I didn't know what they were.
After installing Windows Updates and some drivers from Bootcamp Support, I was able to adjust screen brightnes (in Settings > System > Display) and use my external monitor connecting through Thunderbolt-to-VGA adapter.
Fixing Sound
At first, I followed everything from the video below (I backed it up here in case it gets deleted from the channel).
Here is the steps from the original post that the video referred to.
The sound still didn't work for me though it did for many others on Youtube. Under Sound, video, and game controllers section in the Device Manager settings, the sound driver got a yellow exclamation mark on it as shown here:
Then, I right clicked on it and select Update driver > Browse my computer for drivers. Then, in the Search for drivers in this location box, I browsed to DisplayAudio folder in the downloaded Bootcamp Support file and clicked OK. For my case, the location is C:\Users\Bros\Documents\bootcamp5.1.5769\$WinPEDriver$\IntelHDGraphics64\DisplayAudio.
The yellow exclamation mark was gone but I still couldn't hear any sounds.
After that, I installed this driver CirrusAudioCS4208x64.exe from the Bootcamp Support file but still no luck. For my case, the file location is C:\Users\Bros\Documents\bootcamp5.1.5769\BootCamp\Drivers\Cirrus.
It worked after installing another driver, CirrusAudioCS4206x64.exe, located in the same folder. And the sound drivers in the Device Manager settings updated their names as shown below.