Friday, November 16, 2018

Introduction to Hyperbolic Functions (sinh, cosh, and tanh)

Terminology


A hyperbola (plural hyperbolas or hyperbolae) is an open curl lying on a plane. It has two pieces called branches or connected components. It's one of the three kinds of conic sections (such as parabola→1, the ellipse→2, and hyperbola→3), formed by the intersection of a plane and a double cone.

A cone is a three-dimensional geometric shape that tapers smoothly from a flat base to a point called apex or vertex.


A plane is a flat two-dimensional survey that extends infinitely far.


A conic section is a curve obtained from the intersection of the surface of a cone with a plane.

Some equations produce hyperbolas on the coordinate system as shown in the image below.


Hyperbolic Functions


The ordinary Trigonometric functions (sin, cos, and tan) are constructed using a unit circle but the hyperbolic functions (sinhcosh, and tanh) are constructed using unit hyperbola. The unit circle is a circle with a radius of one.


The unit hyperbolic is the set of points (x,y) in the Cartesian plane that satisfies the equation x2-y2=1. In other words,  x2-y2 always equals 1 if the point (x,y) is on the curve.


A hyperbolic angle (the triangle contained the red area), that has an area a, has a hyperbolic sector with an area half the hyperbolic angle (the red area). The hyperbolic angle a is a real number that is the argument of the hyperbolic functions (sinhcosh, and tanh). I don't know how to measure the area a, but the hyperbolic sector can be calculated (in radians) and then we just multiply it by 2 to get the area a. This video (I uploaded it to my server here) explains how to find the hyperbolic sector.


Below is the formula to calculate the hyperbolic functions. Unlike usual trigonometric functions, x is not an angle. It's the area.


Sunday, November 4, 2018

Enabling Khmer Unicode Keyboard on MacOS Sierra 10.12

You don't need to install anything on MacOS Sierra v10.12 or may be even on Mac OSX Mavericks v10.9. The Khmer Unicode keyboard layout and font (Kh Battambang) are built-in. It was created by Mr. Danh Hong (dnhhng@yahoo.com). To make it show up in the Menu bar, you have to open the Keyboard Preferences and add the keyboard named Khmer in the Input Sources as shown below.


Note that this keyboard layout does not work well with the Khmer fonts created by different developers. The issue can be missing or overlapping characters in Microsoft Offices. You have to use the fonts created by Mr. Danh Hong such as Kh Battambang (similar to Limon S1) and Kh Muol (similar to Limon R1).

Keyboard layout


Tuesday, October 30, 2018

Rotating a View in Swift

In Swift 3, a view or UIView object, has a property called transform, which is of type CGAffineTransform. This property is used to scale or rotate a view's frame rectangle in its superview's coordinate system. The CGAffineTransform struct represents an affine transform matrix used in drawing 2D graphics. Making changes to this property (or assigning a new value to it) triggers a redraw of its view.

Calling button.transform.rotated(by: CGFloat(Float.pi)) does not make any change to the button's transform property. Instead, it constructs a new copy of the property and rotates it. To rotate a button 180 degree, you can call the rotated() method on the existing transform property and assign the returned affine transformation matrix back to it as following:

button.transform = button.transform.rotated(by: CGFloat(Float.pi))

The rotated() method takes a floating-point number as a parameter which is a value of radian.

Radian


Radian is an International System unit used for measuring angles. The value of radian π or 3.14 is converted to an angle of 180 degree.


Affine Transformation


Affine transformation is used to transform an image by preserving points, straight lines, and planes. Examples of an affine transformation are translation, scaling, and rotation. It modifies its matrix to get a new coordinate of each point in an image for transformation.


Monday, October 29, 2018

Introduction to UIScrollView

The contents in your app might be cut off when they exceed the device's screen. Developers have to make them scrollable so the user can see all of the contents. For example, if you have a label (UILabel object) to display a hundred lines of article, you have to put it in a scroll view (UIScrollView object) so that the user can scroll up and down or left and right to see the whole article.

According to Apple's documentation, A scroll view (UIScrollView object) is a view whose origin is adjustable over the content view. It clips the contents to its frame and track the movement of fingers and adjust the origin accordingly. The origin refers to the original position on the screen.


Sample App


I'm developing a pet project called MyCalculator. The image below shows how I designed it in the Interface Builder (IB). I put the label named "Display Sub Section" to display the current operation the user's entering in a scroll view named "Display Sub Section Scroll View". The label for the current operation had a blue background but it did not show up in the image below because its size was zero by default at the design time without any constraints. Note that the scroll view had green background.


Then, I resized the label manually in IB.


But at runtime, the label didn't get wider even though its text was longer that its width, and so it couldn't be scrolled because the label's width is shorter than the scroll view's.


After that, I set constraints for the label's bottom, top, leading, and trailing equal to the scroll view's bottom, top, leading and trailing, respectively.


And it worked. I could scroll the label (blue background) left and right and the scroll indicator appeared but I had to enter the operation until it exceeded the screen's width first.


Note that the scroll view's contentSize.width property is greater than the scroll view's bounds.width property when the label's text exceeds the screen's width. Then, while you're scrolling, the scroll view adjust its origin to show part of the content accordingly.

Problem 1


I want to align the current operation the user's entering to the right as shown in the image below.


But, the content, the label, is left aligned by default when it's inside a scroll view. I cannot change it. It's the top-left corner of the scroll view's origin. When the current operation the user's entering exceeds the screen's width, the user will be able to scroll. I changed the Alignment setting of both the label and the scroll view but no effect. However, I found a workaround by rotating the scroll view as below.

displaySubSectionScrollView.transform = displaySubSectionScrollView.transform.rotated(by: CGFloat(Float.pi))
displaySubSection.transform = displaySubSection.transform.rotated(by: CGFloat(Float.pi))

This post explains in details about the rotated() method.


Introduction to UIStackView.Distribution.fillProportionally property

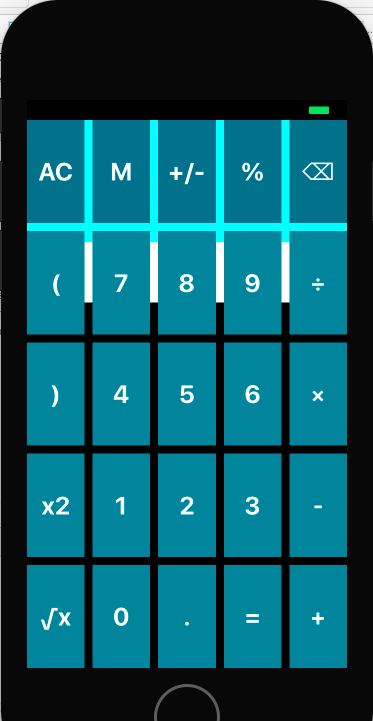
I've developed a pet project called MyCalculator, and the image below shows how its interface looked like.


I used stackviews to lay out the buttons and labels in rows. I used a root stackview, which contains two sub stackviews: one contains the labels to display the current operation and its result and another one contains all the digit and operator buttons.


First, I set the Distribution property of the root stackview to Fill Proportionally and defined a constraint to make the height of its first sub stackview proportionally smaller than its second sub stackview. Their height ratio is 2:6. I did it by Control+click the first stackview and drag to the second stackview then select Equal Heights from the popup menu. After that, I changed the Modifier in the constraint from 1 to 2:6.


Second, I set the Distribution property of the first stackview to Fill Proportionally because it contains two labels, one to display the entering operation and another one to display its result. The entering-operation label should be smaller than the result label. The system will display them based on their intrinsic content sizes (different font sizes, different intrinsic content sizes).

Third, I set the Distribution property of the second stackview to Fill Equally so that the digit and operator buttons have equal sizes. When using Fill Equally distribution, the system does not need to know the intrinsic content size of the stackview's contents. It can calculate the stackview's size based on the device screen's size.

Problem 1

The above solution worked well until I added a scroll view (UIScrollView) for the entering-operation label so that it's scrollable. But, the entering-operation label disappeared when I run the project.


 The reason that the label didn't show up is because the scroll view does not have intrinsic content size so the parent stackview can't calculate its height. I even switched the scroll view with a view (UIView object) and it still didn't work because the UIView object does not have intrinsic content size either. However, it worked when I replaced the scroll view with a stackview. It seems like the parent stackview can guess the inner stack view's size base on the size of its contents.


Then, I created a custom scroll view and override the intrinsicContentSize variable to return a value as following:

import Foundation
import UIKit

public class CustomScrollView : UIScrollView {
    
    @IBInspectable
    var height: CGFloat = 40.0
    
    public override var intrinsicContentSize : CGSize {
        return CGSize(width: 100, height: height)
    }
}

And it worked. However, the height of the entering-operation label is fixed to 40. I want it to dynamically scale according to the screen size so I added a constraint to define its height proportional to the result label's in the ratio of 2:4. Its height then scale dynamically according to the screen's size but the second sub stack view (we talked about above) stretched to the entire screen and overlapped it.


I don't know why. Logically, it should have worked because it did when there were only the two labels without the scroll view. I feel like the system didn't consider the first sub stackview when calculating the size of the second sub stackview.

What's interesting is the second sub stackview no longer overlapped the first sub stackview when I moved it up above the first sub stackview.


My assumption is the system calculated the size of the first sub stackview before the size of the second sub stackview as it found the first sub stack view from the array first. Then, the first sub stack view's size is included in the calculation of the second sub stackview's size.

But, why it worked when I used a stackview instead of a scroll view even if I didn't move the second sub stackview up, as I tested above? Perhaps, it was coded that way for the stackview in the UIKit. It tries to calculate the size of multiple hierarchical level stackview only when each container view is of type UIStackView.

Finally, I found a workaround. I created CustomStackView class by overriding the intrinsicContentSize variable to return any value similar to the CustomScrollView class above and then I modified the first sub stackview to be of type CustomStackView.


Monday, August 13, 2018

Synced MP3 File does not appear in iPhone

I'm using iPhone 6 and iOS 11.4. I used some online converter sites to convert a youtube URL to MP3 file and a local MP4 file to MP3/M4A file. Then, i added the converted file to iTune library to sync with my iPhone. After I've synced it, everything seemed fine cause the file appeared in the playlist i added it to on both iTune and the device. But, when i checked my iPhone, i couldn't see it in the Song section or the playlist i added it to.

At last, I could copy the file to my iPhone successfully by using a different converter site to convert the Youtube URL to MP3 file. The site is https://www.onlinevideoconverter.com/video-converter. I don't know why. I think the audio quality of the converted file is the culprit. The default audio quality that the site used is 192 kbps. For some other sites that didn't work showed 128 kbps for the output file.

Monday, July 30, 2018

Introduction to iOS Game Development

My First App


1). Open Xcode and select File > New > Project... then choose Game and click Next. I fill in the details and choose options for the next page as following.


Xcode will create a sample application, which set the background of the screen to black and display "Hello World" in the middle of it. Every time I tap on the screen, a small square appears for a few second and then disappears. Below is the project files created by Xcode.


This sample application is small but it's still hard to catch up for the beginner like me so I modified it just to show only the black screen.

2). Delete GameScene.sks and Actions.sks files

3). Modify GameViewController.swift file as following:

import UIKit
import SpriteKit

class GameViewController: UIViewController {

    var scene: GameScene!
    
    override var prefersStatusBarHidden: Bool {
        return true
    }
    
    override func viewDidLoad() {
        super.viewDidLoad()
        
        // 1. Configure the main view
                   let skView = view as! SKView
                   skView.showsFPS = true
        
        // 2. Create and configure our game scene
                   scene = GameScene(size: skView.bounds.size)
        scene.scaleMode = .aspectFill
        
        // 3. Show the scene
        skView.presentScene(scene)
    }

}

4). Modify GameScene.swift file as following:

import SpriteKit

class GameScene: SKScene {
    
    required init?(coder aDecoder: NSCoder) {
        super.init(coder: aDecoder)
    }
    
    override init(size: CGSize) {
        super.init(size: size)
        backgroundColor = SKColor(displayP3Red: 0.0, green: 0.0, blue: 0.0, alpha: 1.0)
    }

}


Concepts 


The difference between the sample game application above and the normal Single View application is the view of the view controller. For a Single View application, the view controller's view is of type UIView. But for a 2D game application, the view must be of type SKView, which presents SpriteKit content or scenes (represented by SKScene objects). 

SKScene class is a descendant of SKNode class so we can think of a scene as a node. SKNode does not draw anything, but it applies its properties to its descendants. A scene builds a block for its contents and acts as a root node for a tree of node objects. The root node applies its properties to its descendants and the contents of its descendants. For example, if a node is rotated, all its descendants are also rotated. 

You may switch between scenes using a single SKView object in your window. You can use SKTransition to animate between two scenes.

In the example below, the scene has 5 nodes such as Sky, Missiles, Body, Rotor1, and Rotor2. Sky is the root node.

The image below shows how those nodes are rendered using zPosition and position properties.


References
1). Book: Beginning Swift Games Development for iOS
2). https://developer.apple.com/documentation/spritekit