Thursday, March 28, 2019

Xcode eats up spaces (more than 10 GB)

Once in a while, I got prompted that my disk is running out of spaces. As I'm developing an iOS app using Xcode almost everyday, Xcode can be the culprit.

1). This step alone will claim several Gigabytes of disk space back.

> cd ~/Library/Developer/Xcode/DerivedData
> sudo rm -Rf *
    

2). Remove the oldest directories as many as possible
    
> cd ~/Library/Developer/Xcode/DerivedData/Devices
> ls -lh

total 24
drwxr-xr-x@ 4 vathanakmao  staff   136B Jul 21  2018 010C03D5-989F-4220-879E-023F62601A35
drwxr-xr-x@ 4 vathanakmao  staff   136B Jul 21  2018 05589345-6168-4338-9205-A42BF0C0A30C
drwxr-xr-x@ 5 vathanakmao  staff   170B Nov 27 11:13 0D1069CC-C10F-4D31-BB6E-62AF44C5107E
drwxr-xr-x@ 4 vathanakmao  staff   136B Jun 16  2017 0DF311E9-5E61-47CB-BBEA-6E8FEFC022C9
drwxr-xr-x@ 5 vathanakmao  staff   170B Nov 27 11:13 1115F8DE-BD11-4AD7-AC58-AC217D038CC5
drwxr-xr-x@ 4 vathanakmao  staff   136B Jun 26  2017 13145874-EE01-4E68-AA71-4912D6CF587F
drwxr-xr-x@ 4 vathanakmao  staff   136B Jun 26  2017 154CDEA7-17B5-4352-9603-FE8D6A788F2B
drwxr-xr-x@ 4 vathanakmao  staff   136B Dec 26  2016 15813813-54E7-4D77-8B2B-44B9C9105D73
drwxr-xr-x@ 4 vathanakmao  staff   136B Jul 21  2018 15A9EFFC-8718-4165-B3E9-C72F168511D6
drwxr-xr-x@ 4 vathanakmao  staff   136B Jul 21  2018 233E4A23-6956-4945-A7C8-86E6A7F1C1E5
drwxr-xr-x@ 4 vathanakmao  staff   136B Jun 16  2017 2B44F99E-858D-4AEC-BB3F-B816F27848D9
drwxr-xr-x@ 4 vathanakmao  staff   136B Jun 16  2017 2D27D8AE-26BC-423E-B6D7-7C327D9DA042
drwxr-xr-x@ 4 vathanakmao  staff   136B Jul 21  2018 2F6CEB95-74ED-489E-BBE3-AC8DFF766E79
...


References
https://stackoverflow.com/questions/36239242/xcode-7-3-taking-too-much-space

Tuesday, March 26, 2019

Introduction to UIView

A UIView is an object that manages the content for a rectangular on the screen. There are many kinds of view such as window, button, label and so on.

The bounds and frame properties


UIView is initialized with a frame rectangle. The frame property, represented the frame rectangle, defines the view's size and position in its superview's coordinate system. The bounds property defines the view's size and position in its own coordinate system.


The bounds property is set to the frame property's value during the initialization. If the bounds changes, the frame changes too.


When to use them?

The frame property is used when resizing or moving the view in its superview. The bounds property is used to draw (set the position and size of) the view's content.

The layoutSubviews() method


The method is called whenever the bounds property changes so the developers should override this method to do any UI updates as needed. This method should not be called directly. If we need the view to layout its contents immediately, we should call either setNeededLayout() method or layoutIfNeeded() method.

The example below shows how to create a button with surrounding borders.
    
import Foundation
import UIKit

class BorderButton : CustomButton {
    
    @IBInspectable var inset:Bool = true {
        didSet {
            setNeedsLayout()
        }
    }
    
    @IBInspectable var bottomBorder: CGFloat = 1 {
        didSet {
            setNeedsLayout()
        }
    }
    
    @IBInspectable var rightBorder: CGFloat = 1 {
        didSet {
            setNeedsLayout()
        }
    }
    
    @IBInspectable var leftBorder: CGFloat = 1 {
        didSet {
            setNeedsLayout()
        }
    }
    
    @IBInspectable var topBorder: CGFloat = 1 {
        didSet {
            setNeedsLayout()
        }
    }
    
    @IBInspectable var borderColor: UIColor = UIColor.lightGray {
        didSet {
            setNeedsLayout()
        }
    }
    
    public override func layoutSubviews() {
        super.layoutSubviews()
        
        ViewUtil.setBorders(view: self, top: topBorder, bottom: bottomBorder, left: leftBorder, right: rightBorder, color: borderColor, inset: inset)
    }
}
    

Here is the complete codes of how to add a border to a view.


Layer (CALayer)


A view (UIView) contains at least one layer (CALayer). A CALayer object is responsible for drawing and animate the content. Any objects (UIView, UIButton, or UILabel) added to a UIView object (either in Interface Builder or programmatically) are drawn on the root layer by default.

Like UIView, CALayer also have frame, bounds, and backgroundColor properties. The values of those properties of a UIView object and its root CALayer object always match. Any changes on the view's property have effect on the matching property of the root layer.


Sub Layer 

The root layer of a view can have one or more sub layers. To add a sub layer, call UIView.layer.addSublayer() method. After adding a sub layer, any new objects you programmatically add to the view (by calling view.addSubview() method) are drawn on the sub layer. By default, the sublayer's backgroundColor property is nil and size is zero but its content still appear in the view. This is the purpose of the layer. If the sublayer and the root layer have the same frame's sizes and the sublayer's backgroundColor is set to yellow, for example, the root layer and its content completely disappear.


Layout Margins


A view has margins to define spaces between its content and its top, left, bottom, and right edges. For more details, go to this post.


Auto Layout and Constraints


A view can layout its contents dynamically (automatically) based on a predefined constraint. Go to this post for more details.


Monday, March 25, 2019

Highlight the selected cell in UICollectionView

This post is based on Xcode 9 and Swift 3. By default, when a user touches an item or a cell of a UICollectionView, some properties are updated and some events are triggered but there is no any UIs updated. It's the developer's job to update the UIs.

In the page below, there are a collection of themes displaying. When a user touches a theme, I want to show a green rectangle around it.


In the ViewController class, the UICollectionView.allowsMultipleSelection property should be set to false so that the user can select only one item/cell. When the user touches a cell, its isSelected property is set to true so the code to update the UIs for the cell should be done in the didSet block of the property as following:

class ThemeCollectionViewCell: UICollectionViewCell {
    ...
    
    @IBOutlet weak var rootStackView: UIStackView!
    
    override var isSelected:Bool {
        didSet {
            if isSelected {
                rootStackView.addBorders()
            } else {
                rootStackView.removeBorders()
            }
        }
    }
}
 

In case there is an item (cell) to be selected by default, the selectItem() method should be called in the ViewController.viewDidAppear() method to take effect then the isSelected property of the selected cell will be set to true.

Here is an example of how to add the borders to a stack view.

Add borders to a stackview

This post is based on Xcode 9 and Swift 3. I used UIStackView to divide the page into different sections with gray borders as shown in the image below.


I created a custom UIStackView class named BorderStackView as followings:
    
import Foundation
import UIKit

class BorderStackView : UIStackView {
    
    @IBInspectable var inset:Bool = true {
        didSet {
            setNeedsLayout()
        }
    }
    
    @IBInspectable var bottomBorder: CGFloat = 1 {
        didSet {
            setNeedsLayout()
        }
    }
    
    @IBInspectable var rightBorder: CGFloat = 1 {
        didSet {
           
            setNeedsLayout()
        }
    }
    
    @IBInspectable var leftBorder: CGFloat = 1 {
        didSet {
            setNeedsLayout()
        }
    }
    
    @IBInspectable var topBorder: CGFloat = 1 {
        didSet {
            setNeedsLayout()
        }
    }
    
    @IBInspectable var borderColor: UIColor = UIColor.lightGray {
        didSet {
            setNeedsLayout()
        }
    }
    
    public override func layoutSubviews() {
        super.layoutSubviews()
        
        ViewUtil.setBorders(view: self, top: topBorder, bottom: bottomBorder, left: leftBorder, right: rightBorder, color: borderColor, inset: inset)
    }
   
}
    

To remove a border, for example the top border, set topBorder property either programmatically or in Interface Builder to zero.

When the inset property is true, the borders are drawn inside the stackview's frame. Otherwise, they are drawn outside the frame.

And here is the body of the ViewUtil class:
    
import Foundation
import UIKit

class ViewUtil {
    private static let layerNameTopBorder = "topBorder"
    private static let layerNameBottomBorder = "bottomBorder"
    private static let layerNameLeftBorder = "leftBorder"
    private static let layerNameRightBorder = "rightBorder"
    
    static func setBorders(view: UIView, top topWidth: CGFloat, bottom bottomWidth: CGFloat, left leftWidth: CGFloat, right rightWidth: CGFloat, color: UIColor,inset:Bool = true) {
        var topBorderLayer:CALayer?
        var bottomBorderLayer:CALayer?
        var leftBorderLayer:CALayer?
        var rightBorderLayer:CALayer?
        for borderLayer in (view.layer.sublayers)! {
            if borderLayer.name == layerNameTopBorder {
                topBorderLayer = borderLayer
            } else if borderLayer.name == layerNameRightBorder {
                rightBorderLayer = borderLayer
            } else if borderLayer.name == layerNameLeftBorder {
                leftBorderLayer = borderLayer
            } else if borderLayer.name == layerNameBottomBorder {
                bottomBorderLayer = borderLayer
            }
        }


        // top border
        if topBorderLayer == nil {
            topBorderLayer = CALayer()
            topBorderLayer!.name = layerNameTopBorder
            view.layer.addSublayer(topBorderLayer!)
        }
        if inset {
            topBorderLayer!.frame = CGRect(x: view.bounds.minX, y: view.bounds.minY, width: view.bounds.width, height: topWidth)
        } else {
            topBorderLayer!.frame = CGRect(x: view.bounds.minX - leftWidth, y: view.bounds.minY - topWidth, width: view.bounds.width + leftWidth + rightWidth, height: topWidth)
        }
        topBorderLayer!.backgroundColor = color.cgColor


        // bottom border
        if bottomBorderLayer == nil {
            bottomBorderLayer = CALayer()
            bottomBorderLayer!.name = layerNameBottomBorder
            view.layer.addSublayer(bottomBorderLayer!)
        }
        if bottomWidth >= 0 {
            if inset {
                bottomBorderLayer!.frame = CGRect(x: view.bounds.minX, y:view.bounds.size.height - bottomWidth, width:view.bounds.size.width, height: bottomWidth)
            } else {
                bottomBorderLayer!.frame = CGRect(x: view.bounds.minX - leftWidth, y:view.bounds.size.height, width:view.bounds.size.width + leftWidth + rightWidth, height: bottomWidth)
            }
            bottomBorderLayer!.backgroundColor = color.cgColor
        }


        // left border
        if leftBorderLayer == nil {
            leftBorderLayer = CALayer()
            leftBorderLayer!.name = layerNameLeftBorder
            view.layer.addSublayer(leftBorderLayer!)
        }
        if inset {
            leftBorderLayer!.frame = CGRect(x: view.bounds.minX, y: view.bounds.minY, width: leftWidth, height: view.bounds.height)
        } else {
            leftBorderLayer!.frame = CGRect(x: view.bounds.minX - leftWidth, y: view.bounds.minY, width: leftWidth, height: view.bounds.height)
        }
        leftBorderLayer!.backgroundColor = color.cgColor


        // right border
        if rightBorderLayer == nil {
            rightBorderLayer = CALayer()
            rightBorderLayer!.name = layerNameRightBorder
            view.layer.addSublayer(rightBorderLayer!)
        }
        if inset {
            rightBorderLayer!.frame = CGRect(x: view.bounds.width - rightWidth, y: 0, width: rightWidth, height: view.bounds.height)
        } else {
            rightBorderLayer!.frame = CGRect(x: view.bounds.width, y: 0, width: rightWidth, height: view.bounds.height)
        }
        rightBorderLayer!.backgroundColor = color.cgColor
    }
    
}


Monday, March 18, 2019

Display images horizontally in a listbox with UICollectionView

I'm using Xcode 9 and swift 3 to developing a pet project. It requires showing a list of images horizontally at the bottom of the screen as shown in the image below.


1. Add UICollectionView in Interface Builder


- Drag UICollectionView from the Object Library and drop it on the View Controller and set appropriate constraints (related to its superview).

- Drag UIImageView from the Object Library and drop it on the UICollectionViewCell come with the UICollectionView object and set appropriate constraints related to the UICollectionViewCel. (Don't set constraints for the UICollectionViewCell)


2. Create a custom UICollectionViewCell class


- Select File menu > New > File...
- Select Cocoa Touch Class and click Next
- Set "Class" to ImageCollectionViewCell then "Subclass of" to UICollectionViewCell and make sure the "Also create XIB file" checkbox is unchecked cause we don't need it.

- Open ImageCollectionViewCell.swift file and create an outlet connected to the UIImageView control added in the step above.

import UIKit

class ImageCollectionViewCell: UICollectionViewCell {
        
    @IBOutlet weak var imageView: UIImageView!
}
 

- Within the storyboard, select the UICollectionViewCell control then open Identity Inspector and set Class under Custom Class section to ImageCollectionViewCell. After that, open Attributes Inspector and set Identifier under Collection Reusable View section to ImageCollectionViewCell.

3. Make the ViewController class conform to UICollectionViewDelegate and UICollectionViewDataSource


Create an outlet connected the UICollectionView control in the Interface Builder to the ViewController class and update it as following:


import Foundation
import UIKit

public class ViewController : UIViewController, UICollectionViewDelegate, UICollectionViewDataSource {
    
    @IBOutlet weak var collectionView: UICollectionView!
    
    private var images = [
        UIImage(named:"theme_1"),
        UIImage(named:"theme_2"),
        UIImage(named:"theme_3"),
        UIImage(named:"theme_4")
    ]
    
    public override func viewDidLoad() {
        collectionView.delegate = self
        collectionView.dataSource = self
    }
    
    public func collectionView(_ collectionView: UICollectionView, numberOfItemsInSection section: Int) -> Int {
        return images.count
    }
    
    public func collectionView(_ collectionView: UICollectionView, cellForItemAt indexPath: IndexPath) -> UICollectionViewCell {
        let cell = collectionView.dequeueReusableCell(withReuseIdentifier: "ImageCollectionViewCell", for: indexPath) as! ImageCollectionViewCell
        cell.imageView.image = images[indexPath.row]
        return cell
    }
    
}
 

Note that any operations related to the sizes of cell's subviews should not be done in those methods of UICollectionViewCellDelegate because the frame and bounds properties are not finalized yet. Do it in layoutSubviews() method of the cell instead.

Setting the size of the cell in the method below does not have any effects.

public func collectionView(_ collectionView: UICollectionView, cellForItemAt indexPath: IndexPath) -> UICollectionViewCell {
}


Setting the size of each cell and space between them


The ViewController must conform to UICollectionViewDelegateFlowLayout protocol and implement its methods.

The code snippets below is an example of how to set the size of a cell:

    public func collectionView(_ collectionView: UICollectionView, layout collectionViewLayout: UICollectionViewLayout, sizeForItemAt indexPath: IndexPath) -> CGSize {
        // The height and width of the container view (stackview)
        // of the four buttons in the cell (xib file)
        // should be the same to make them look completely circles.
        // Then, the cell's width should be equal to cell's height
        // plus the tick buttons's width.
        // We have a constraint in the IB to define the tick button's width
        // equal to one-fourth width of the container view
        // so this size will fit them right.
        let cellHeight = collectionView.bounds.height - 10
        let tickButtonWidth = cellHeight / 4
        let cellWidth = tickButtonWidth + cellHeight
        return CGSize(width: cellWidth, height: cellHeight)
    }
 

This is an example of how to set the space between cell in the same row:

    public func collectionView(_ collectionView: UICollectionView, layout collectionViewLayout: UICollectionViewLayout, minimumLineSpacingForSectionAt section: Int) -> CGFloat {
        return 25
    } 

The example below tells how to set the space between the collection view and its contents:
    
    public func collectionView(_ collectionView: UICollectionView, layout collectionViewLayout: UICollectionViewLayout, insetForSectionAt section: Int) -> UIEdgeInsets {
        return UIEdgeInsets(top: 0, left: 10, bottom: 0, right: 10)
    } 


References
https://www.youtube.com/watch?v=SL1ZmIp83iI

Xcode Error: iPhone has denied the launch request

i've been testing my project on my iPhone for many months without any problem. Today, it stopped working. When I click the Run button in Xcode to run the app on my device, Xcode showed the error message. I've tried many solutions on the net like deleting the provisioning profile through the Keychain Access app but no luck.


Solution


- Open Keychain Access app then select login in the upper left pane and Certificates in the lower left pane
- In the right pane, select the item "iPhone Developer: <my-email>" and press delete


After deleting the provisioning profile, Xcode will perform code signing and install a new provisioning profile into your device again when you run the project.

I don't know why we have to delete it but before I deleted the certificate in the Keychain Access app, I saw its expiration date had passed already. Perhaps, there was a bug in Xcode that it couldn't renew the certificate automatically.


Workaround


- From within Xcode (v9), select Product > Scheme > Edit Scheme...
- Select Run from the left pane then click on the Info tab and uncheck "Debug executable" checkbox

Someone here said that it's because i'm using Adhoc provisioning profile and this workaround just hide the issue. It doesn't fix it.


Reference
https://stackoverflow.com/questions/45421179/xcode-9-error-iphone-has-denied-the-launch-request


Thursday, March 14, 2019

Integrating Ad Banner in iOS App

I want to show an ad banner at the bottom of the screen in my app like below.

1. Create AdMob account


Go to https://apps.admob.com/signup/ and follow the instructions. Note that AdMob requires Google Adsense account.

AdMob provides SDK for developers to integrate an ad banner (GADBanerView) into their apps. It has many other features like showing only the most payable ads.

2. Download AdMob's SDK and add it to the project


- Download the zip file from here https://developers.google.com/admob/ios/download
- Extract it to a directory, for example: /Volumes/Data/Workspace/Frameworks
- Add it to the project in Xcode by following the instruction here

3. Initialize Mobile Ads SDK


Call configure(withApplicationID:) method in AppDelegate.swift as following:

import GoogleMobileAds

@UIApplicationMain
class AppDelegate: UIResponder, UIApplicationDelegate {

    var window: UIWindow?

    func application(_ application: UIApplication, didFinishLaunchingWithOptions launchOptions: [UIApplicationLaunchOptionsKey: Any]?) -> Bool {
        GADMobileAds.configure(withApplicationID: "ca-app-pub-3940256099942544~1458002511")
        return true
    }
}
 

The app ID is a test app ID created by AdMob for public use during development. Using the production app ID for development might cause the AdMob account suspended.

4. Update Info.plist file


Open Info.plist file and add a new key, GADApplicationIdentifier , with the string value of the AdMob (test) App ID under Information Property List. It's required by AdMob's SDK.


5. Add GADBannerView to the view hierarchy


In Interface Builder, drag a UIView from the Object Library and add it to the storyboard. Then, open the Identity Inspector and change the Class setting under Custom Class to GADBannerView. Here is the list of the standard banner sizes. I chose 320x50.


6. Configure GADBannerView's properties


Create an outlet named adBanner to connect the GADBannerView in the storyboard with the ViewController. Then, in the ViewController's viewDidLoad() method, initialize two required properties:
- rootViewController: the view controller used to present an overlay when the ad is clicked. Usually, it's set to the view controller that contains the GADBannerView.
- adUnitID: obtain it while registering AdMob account. It identifies a banner view to display in the app.

adBanner.rootViewController = self
adBanner.adUnitID = "ca-app-pub-3940256099942544/2934735716" // test ID

7. Load an ad


Once the banner is placed and its properties are set, it's time to load the ad. Call the load() method in the viewDidLoad():
adBanner.rootViewController = self
adBanner.adUnitID = "ca-app-pub-3940256099942544/2934735716"
adBanner.load(GADRequest())

8. Ad event (optional)


Through the use of GADBannerViewDelegate, we can listen for lifecycle events such as when the ad is closed or the user leaves the app.


FAQs


> Who pay for the ad click or view to the app developer?
- App developers get paid through Google Adsense
- App developers use Google AdMob (a mobile ad platform) to integrate ads from Google advertisers into their apps. AdMob provides iOS or Android SDKs to the developers to do so. AdMob has useful features like showing only the most payable Ads.

> Google Adsense
- Earn money by embedding an ad banner in a blog or web site.
- You don't need to specify the payment method until the your earning has reached the threshold ($100)

> Google AdMob
- Provide SDKs (many types of banners) for mobile apps


References


https://developers.google.com/admob/ios/quick-start
https://developers.google.com/admob/ios/banner


Add Third-Part Framework to Xcode Project

1. Create a new directory for third-party frameworks, for example, /Volumes/Data/Workspace/Frameworks

2. Copy the *.framework file to the new directory

3. Add the new directory to the Xcode's "Framework Search Paths" setting


4. Add the framework to the project in Xcode by select the project in Project Navigator > General > Linked Frameworks and Libraries then click on the plus sign and browse to the framework.


Note that I used Xcode 9 to test it.


References
https://developer.apple.com/library/archive/documentation/MacOSX/Conceptual/BPFrameworks/Tasks/IncludingFrameworks.html

Tuesday, March 12, 2019

Rounded Corner UIButton

I'm developing a pet project and I want to display the buttons with rounded corners as shown in the image below.


I subclassed the UIButton and override the layoutSubviews() method as following:
    
    public override func layoutSubviews() {
        super.layoutSubviews()
        
        self.layer.cornerRadius = 0.1 * bounds.size.width
    }
 

Concepts


Layers

Each view in Swift has one root layer, which might contain one or more sub layers. Layers are used to draw and animate the view's contents.


Corner Radius

The images below explain what the corner radius is. The longer the corner radius, the bigger rounded corner.


References

https://developer.apple.com/documentation/quartzcore/calayer
https://www.hackingwithswift.com/example-code/calayer/what-is-calayer


Handling Swipe Gesture in Swift

I'm developing a pet project and i need to swipe the screen left or right to switch between subviews as shown in the image below.


1. Add the following lines to the ViewController's viewDidLoad() method


    let right = UISwipeGestureRecognizer()
    right.direction = .right
    right.addTarget(self, action: #selector(swipeGestureHandler(_:)))
    buttonsContainerView.addGestureRecognizer(right)
        
    let left = UISwipeGestureRecognizer()
    left.direction = .left
    left.addTarget(self, action: #selector(swipeGestureHandler(_:)))
    buttonsContainerView.addGestureRecognizer(left)
 

The swipe gesture recognizer was added for the container view of those buttons. The buttons will detect the finger movement and propagate the event to their parent view. The parent/container view will call the handler method, swipeGestureHandler(_:), for the swipe event.

2. Add the event handler method

    
    @objc public func swipeGestureHandler(_ gestureRecognizer:UISwipeGestureRecognizer) {
        if gestureRecognizer.state == .ended
            && gestureRecognizer.numberOfTouchesRequired == 1 {
            
            if gestureRecognizer.direction == .right {
                slideInAdvancedOperationsView()
            } else if gestureRecognizer.direction == .left {
                slideInBasicOperationsView()
            }
        }
    }
 

The handler method must be marked with @objc.


Monday, March 11, 2019

Slide-in Subview in Swift

I'm developing a pet project, and I want to make a slide-in subview as shown in the image below.


1. Adding the slide-in view and animate it


@IBAction func historyButtonTouched(_ sender: HistoryButton) {
        
        if historyPopupHidden() {
            buttonsStackView.addSubview(historyPopupBackground!) // add and bring to front
            historyPopupBackground?.leadingAnchor.constraint(equalTo: buttonsStackView.leadingAnchor).isActive = true
            historyPopupBackground?.trailingAnchor.constraint(equalTo: buttonsStackView.trailingAnchor).isActive = true
            historyPopupBackground?.topAnchor.constraint(equalTo: buttonsStackView.topAnchor).isActive = true
            historyPopupBackground?.bottomAnchor.constraint(equalTo: buttonsStackView.bottomAnchor).isActive = true
            historyPopupBackground?.translatesAutoresizingMaskIntoConstraints = false

            buttonsStackView.addSubview(historyPopup!) // add and bring to front
            historyPopup?.leadingAnchor.constraint(equalTo: buttonsStackView.leadingAnchor).isActive = true
            historyPopup?.topAnchor.constraint(equalTo: buttonsStackView.topAnchor).isActive = true
            historyPopup?.bottomAnchor.constraint(equalTo: buttonsStackView.bottomAnchor).isActive = true
            historyPopup?.widthAnchor.constraint(equalToConstant: 280).isActive = true
            historyPopup?.translatesAutoresizingMaskIntoConstraints = false
            
            let tx = (historyPopup?.frame.width)!
            historyPopup?.transform = CGAffineTransform(translationX: -1 * tx, y: 0)
            UIView.animate(withDuration: 0.3, animations: {
                self.historyPopup?.transform = (self.historyPopup?.transform.translatedBy(x: tx, y: 0))!
            })
        } else {
            hideHistoryPopup()
        }
}
 

The historyPopup view is loaded from a nib file in viewDidLoad() method. The historyPopupBackground is just a custom UIView with a transparent black background and is initialized in viewDidLoad() as well. Read here to understand what CGAffineTransform is for.

2. Removing the subview


private func hideHistoryPopup() {
        let tx = (historyPopup?.frame.width)!

        UIView.animate(withDuration: 0.3, animations: {
            self.historyPopup?.transform = (self.historyPopup?.transform.translatedBy(x: -1 * tx, y: 0))!
        }, completion: { (finished: Bool) in
            if finished {
                self.historyPopup?.removeFromSuperview()
                self.historyPopupBackground?.removeFromSuperview()
            }
        })
}


Sunday, March 10, 2019

Download entire website like Apple's Developer Documentation on MacOS

1). Download and install SiteSucker application (the app is working fine on MacOS Sierra)

2). Open the app and click on the Settings icon then select Path pane and Paths to Exclude

3). Paste the following URLs (contains regular expressions) in the listbox

https://developer.apple.com/documentation/[a-rt-z].*
https://developer.apple.com/documentation/s[a-vx-z].*
 
4). Check the "Use Regular Expressions" checkbox

The URL patterns above allows me to download https://developer.apple.com/documentation/swift and any necessary resource files (JS, CSS, images, etc.) under or outside the directory. It won't download the other URLs such as:
https://developer.apple.com/documentation/foundation
https://developer.apple.com/documentation/mapkit
https://developer.apple.com/documentation/uikit
https://developer.apple.com/documentation/gamekit 

Saturday, March 9, 2019

Copy, Cut, and Paste Operations using Swift

Copy a string to the pasteboard


1). Write data to the pasteboard programmatically
    
UIPasteboard.general.setValue("hello", forPasteboardType: "public.plain-text")
 
2). Open another app for example, Google Chrome browser, and touch the address bar twice to show the edit menu (copy, cut, and paste commands). Then, touch Paste.


Concepts


Pasteboard


A pasteboard is an area for storing data shared within an app or between apps. There are two types of pasteboard: public/system and private/app. We can access the system pasteboard through the type property general of UIPasteboard class. The system pasteboard is shared among apps. The data written to the pasteboard by the previous app get overridden by the data written by the current app. There may be one or two items stored on the pasteboard. An item might group one or more types of the data. We should store multiple types of data so that it's compatible with many apps.


UTI (Uniform Type Identifier)


UTI is a string to identify a class of entities (documents, pasteboard data, and bundles). UTI replaces the incompatible existing methods of tagging data. Currently, for example, a JPEG file is identified by any of the following methods:
1. A four character type code of JPEG
2. A filename extension of .jpg
3. A filename extension of .jpeg
4. A MIME type of image/jpeg
With UTI, the data is identified by the string public.jpeg. Then, we can use a utility function to translate from one to the other.

The key advantage of UTI over the other tagging methods is a conformance hierarchy. For example, the UTI public.html, which defines HTML text, conforms to the base text identifier, public.text. In this case, conformance lets applications which can open the general text files identify HTML files as ones i can open as well.


References
https://developer.apple.com/library/archive/documentation/StringsTextFonts/Conceptual/TextAndWebiPhoneOS/UsingCopy,Cut,andPasteOperations/UsingCopy,Cut,andPasteOperations.html#//apple_ref/doc/uid/TP40009542-CH11-SW21
https://developer.apple.com/library/archive/documentation/FileManagement/Conceptual/understanding_utis/understand_utis_conc/understand_utis_conc.html#//apple_ref/doc/uid/TP40001319-CH202-CHDHIJDE


Friday, March 8, 2019

Swift Error: nib must contain exactly one top level object which must be a UITableViewCell instance

I'm developing a pet project, which requires loading a UITableViewCell from a XIB file. At first, it worked fine but after making some changes, I got the error when the system trying to load the UITableViewCell from a nib file to construct the UITableView object.

Cause


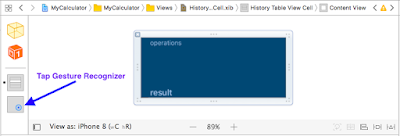
It's because I accidentally dragged a Tap Gesture Recognizer from the Object Library and dropped it on the UITableViewCell in IB.


Solution


Click on the Tap Gesture Recognizer icon and press Delete key.