After starting Clash Of Clans (COC) for several seconds, it shows WiFi drop symbol in the middle of the screen and I can't attack at all. Sometimes, it happens in the middle of attack. I tried to restart the app and the phone many times but the problem wasn't solved. This happened on both WiFi and mobile internet (4G, 3G, or 2G) but only on specific devices, Redmi 8A in my case. The problem does not appear on my iPhone 5s, iPhone 6, and iPad mini 2.
Using Game Speed Booster fixed the problem. Game Speed Booster is part of MIUI Security app. MIUI is Android-based operating system for MI and Redmi phones. Game Speed Booster improves gamer's experiences by restricting background app sync, maintaining network stability, preventing network switching, boosting CPU usage, improve screen's sensitivity, and more.
I had to start COC from within Game Speed Booster every time to get it boosted.
Saturday, December 14, 2019
Friday, December 13, 2019
Useful Apps I'm Using On Samsung Galaxy A10s
Volume Control (by Netroken)
The volume buttons are on the left and the power button is on the right. Every time I press the power button with my thumb, my index finger press the lower volume button accidentally, and it lowers the in-call volume.
To solve this issue, I use the Volume Control app to lock the in-call volume at its max, which can't be modified by the volume buttons. This app works on non-rooted devices.
AutoStart App Manager (by The Sugar Apps)
Since the Volume Control can't start itself when the system boots, I use this app to auto start it. This app works on non-rooted devices.
I tried AutoStart - No root, BootManager, and Autorun Manager apps, and they started the Volume Control app when I opened them but they didn't start themselves when the phone started.
Then, I tried Boot Apps and it did start itself and the Volume Control at boot time but it also brought the Volume Control to the foreground.
Saturday, July 27, 2019
Introduction to UINavigationController
What is it?

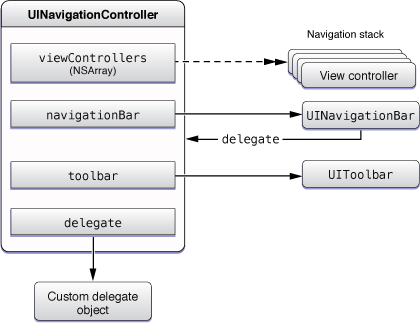
The below image shows the objects managed by a navigation controller. It stores child view controllers in an array. Pushing a view controller to the array make the view controller's view presented. The last view controller in the array or stack displays over the others.
Why use it?
How to do it?
I have MyCalculator app with a Settings page as shown in the image below.

1). Embed the view controller in a navigation controller
Below is SettingsViewController defined in the Interface Builder (IB).

Click on the view controller and select Editor menu then Embed In > Navigation Controller. It then would look like this:

2). SettingsViewController.swift
import UIKit

class SettingsViewController: UITableViewController {

    typealias Item = (cellLabel: String, vcId: String?)

    private var items: [Item] = [
        (cellLabel: "Themes", vcId: "vcTheme"),
        (cellLabel: "Decimal Places", vcId: "vcDecimalPlaces"),
        (cellLabel: "Decimal Notation", vcId: "vcDecimalNotation"),
        (cellLabel: "Disable Auto-Lock", vcId:  nil)
    ]

    private var tapGestureRecognizer = UITapGestureRecognizer()

    override func viewDidLoad() {
        super.viewDidLoad()

        tableView.register(UINib(nibName: "SwitchTableViewCell", bundle: nil), forCellReuseIdentifier: "tbcSwitch")
        tableView.addGestureRecognizer(tapGestureRecognizer)
        tapGestureRecognizer.addTarget(self, action: #selector(tapGestureHandler(_:)))

        let closeButton = UIBarButtonItem(title: "Close", style: .done, target: self, action: #selector(closeButtonHandler(_:)))
        navigationController?.navigationBar.topItem?.rightBarButtonItem = closeButton
    }

    @objc public func closeButtonHandler(_ sender:UIBarButtonItem) {
        dismiss(animated: true, completion: {})
    }

    @objc public func tapGestureHandler(_ sender: UITapGestureRecognizer) {
        let tappedPoint = sender.location(in: tableView)
        if let indexPath = tableView.indexPathForRow(at: tappedPoint) {
            let item = items[indexPath.row]
            if let vcId = item.vcId {
                let vc = storyboard?.instantiateViewController(withIdentifier: vcId)
                vc?.title = item.cellLabel
                navigationController?.pushViewController(vc!, animated: true)
            }
        }
    }

    ...

    // Required tableView() methods

}
I'm using TapGestureRecognizer to detect the selected row in the Settings page and then present the corresponding view controller.
The items variable stores identifiers of the child view controllers designed in the Interface Builder. The selected identifier is used to instantiate the corresponding view controller and present it, by pushing it to the navigation controller's array.
navigationController?.pushViewController(vc!, animated: true)
3). Add action to the Settings button/icon in the home page
Suppose I have ViewController for the home page designed in the Interface Builder and its file named ViewController.swift. Control-drag the Settings button in the ViewController from the Storyboard to the ViewController.swift file and create an action connection.
    @IBAction func settingsButtonTouched(_ sender: SettingsButton) {
        present(settingsViewController, animated: true, completion: {})
    }
After that, add a variable to the ViewController class as following:
private var settingsViewController:UIViewController!
Then, initialize it in viewDidLoad() method:
settingsViewController = storyboard?.instantiateViewController(withIdentifier: "vcNavigation") as! UINavigationController
Note that we present the SettingsViewController from the home page, not its navigation controller. The navigation controller, as its name implied, just navigates the child view controllers of the SettingsViewController.
References
Introduction to a property list with Swift
What is a property list?
A property list is a file system with the extension plist, which represents an object graph.
When to use it?
It's portable and efficient to store a small amount of data. It should not be used to store a complex object graph. If the data is not likely to change, should we hard-code (store the data with the source code) it instead? For best practices, data should be stored separately from the source code because it's less error prone and we don't need to recompile the program every time when we change the data.
Reading a property list into an array (of a dictionary)
    private var _decimalPlaces:[DecimalPlace] = []
    var decimalPlaces:[DecimalPlace] {
        get {
            if _decimalPlaces.isEmpty {
                do {
                    let dp = try loadAsArray(filename: "DecimalPlaces", format: .xml)
                    _decimalPlaces = toDecimalPlaces(dp)
                } catch {
                    fatalError("Failed to load decimal places from property list file.")
                }
            }
            return _decimalPlaces
        }
    }

    func loadAsArray(filename: String, format: PropertyListSerialization.PropertyListFormat = .xml) throws -> [AnyObject] {
        var result:[AnyObject] = []
        if let path = Bundle.main.path(forResource: filename, ofType: "plist") {
            if let xml = FileManager.default.contents(atPath: path) {
                var plistFormat = format
                result = try PropertyListSerialization.propertyList(from: xml, options: .mutableContainersAndLeaves, format: &plistFormat) as! [AnyObject]
            }
        }
        return result
    }

    private func toDecimalPlaces(_ src:[AnyObject]) -> [DecimalPlace] {
        var result:[DecimalPlace] = []
        for i in 0..
The source code above works with the property list file, DecimalPlaces.plist, with the contents below. It's in the root directory of the project like Info.plist file.

Below is the content of DecimalPlace class:
class DecimalPlace {
    var id:Int!
    var value:UInt?
    var label:String!
    var description:String!

    init() {
    }
}
Reading a property list into a dictionary
    func load(filename: String, format: PropertyListSerialization.PropertyListFormat = .xml) throws -> [String:AnyObject] {
        var result:[String:AnyObject] = [:]
        if let path = Bundle.main.path(forResource: filename, ofType: "plist") {
            if let xml = FileManager.default.contents(atPath: path) {
                var plistFormat = format
                result = try PropertyListSerialization.propertyList(from: xml, options: .mutableContainersAndLeaves, format: &plistFormat) as! [String:AnyObject]
            }
        }
        return result
    }
The code snippets above works with the property list file with the contents below:

References
https://developer.apple.com/library/archive/documentation/General/Conceptual/DevPedia-CocoaCore/PropertyList.html
Thursday, July 18, 2019
Embedding a view controller's root view in another view controller's view
We can add a view controller's root view to another view controller's view for reusability purpose.

We can programmatically add a view controller's root view to a subview of another view controller as following:
public class ThemesViewController : UIViewController {

 @IBOutlet weak var previewView: UIStackView!
 var vcMain:ViewController!

 ...

 public override func viewDidLoad() {
   vcMain = storyboard?.instantiateViewController(withIdentifier: "vcMain") as! ViewController
 }

 public override func viewWillAppear(_ animated: Bool) {
                // The system does not wait until each view in the hierarchy
                // has updated its layout before calling the viewWillAppear() method
                // so some subviews still have incorrect bounds
                // and will change in viewDidAppear() method.
                // Calling layoutIfNeeded() method forces the previewView to
                // update its layout immediately so we get the correct bounds here.
                previewView.layoutIfNeeded()

                self.addChildViewController(vcMain)
  previewView.addSubview((vcMain.view)!)
  vcMain.didMove(toParentViewController: self)
 }
}
The addChildViewController() method calls the willMove(toParentViewController:) of the child view controller for us so we can override the method and do more things if needed.
The didMove(toParentViewController: self) method of the child view controller have to be called after the child view controller's root view has been added to the parent view controller's view and any necessary constraints between the views have been defined. This method gives the chance to the child view controller to perform any actions if needed, responding to the change in view ownership (by overriding the method). Note that my project still worked correctly even if I didn't call didMove(toParentViewController:) method.
In my case, the size and position of the previewView were already set in the Interface Builder so I don't have to programmatically create constraints for the previewView, after calling previewView.addSubview((vcMain.view)!) as mentioned here.
Monday, July 8, 2019
Introduction to User's Defaults Database
To store user's preferences in an app, we can use the user's defaults database, which will be created by the system on each device (iOS or Mac OS) by the time we access it. Note that the database is not suitable for large data and heavy transactions. Preferences are grouped into domains. There are 5 different types of domains:
1). The argument domains (UserDefaults.argumentDomain): Volatile
2). Application (identified by the app's identifier, for example, com.vathanakmao.MyCalculator): Persistent, should be used by their corresponding apps.
3). The global domains (UserDefaults.globalDomain): Persistent, used by system frameworks and accessed by different apps.
4). The languages domains: Volatile
5). The registration domain (UserDefaults.registrationDomain): Volatile
The lifetime of a preference depends on the domain, in which it is stored in. Some domains store preferences persistently, which means that the preferences continue to exist across app launches. Some others store preferences in more volatile way (shorter life), keeping preference values only for the life of the corresponding user defaults object (the user defaults object may be destroyed by the system or when the app exits).
For example, calling UserDefaults.standard.register(default: [String, Any]) method stores the preference dictionary object in the registration domain, and the object is deleted when the app exits. We can test it while in development by adding the code in the AppDelegate class and run the project in the simulator from Xcode. After that, quit the simulator and remove the code from the AppDelegate then run the project again. In contrast, calling the UserDefaults.standard.set(_,forKey)method stores the preference object persistently, which means that the object can still be accessed in the next sub sequent project launches even if after the method call is removed.
It's recommended that the value should be as simple as possible for better performance even though the Data type is supported. The value of a primitive type would be ideal.
If the object does not exist, the returned value falls back to the default value of its corresponding type. It would be 0 (zero) in the case above (, and false in case it's Bool)
The system searches for the key in all domains one by one based on their orders listed above until the key is found.
For example, calling UserDefaults.standard.integer(forKey) method on non-existent key would return 0 (zero), but 0 is meaningful in our case and we want it to return a different number like -1 (minus one). We should register the default value for that key in AppDelegate class as following:
References
https://developer.apple.com/library/archive/documentation/Cocoa/Conceptual/UserDefaults/AboutPreferenceDomains/AboutPreferenceDomains.html#//apple_ref/doc/uid/10000059i-CH2-SW6
1). The argument domains (UserDefaults.argumentDomain): Volatile
2). Application (identified by the app's identifier, for example, com.vathanakmao.MyCalculator): Persistent, should be used by their corresponding apps.
3). The global domains (UserDefaults.globalDomain): Persistent, used by system frameworks and accessed by different apps.
4). The languages domains: Volatile
5). The registration domain (UserDefaults.registrationDomain): Volatile
The lifetime of a preference depends on the domain, in which it is stored in. Some domains store preferences persistently, which means that the preferences continue to exist across app launches. Some others store preferences in more volatile way (shorter life), keeping preference values only for the life of the corresponding user defaults object (the user defaults object may be destroyed by the system or when the app exits).
For example, calling UserDefaults.standard.register(default: [String, Any]) method stores the preference dictionary object in the registration domain, and the object is deleted when the app exits. We can test it while in development by adding the code in the AppDelegate class and run the project in the simulator from Xcode. After that, quit the simulator and remove the code from the AppDelegate then run the project again. In contrast, calling the UserDefaults.standard.set(_,forKey)method stores the preference object persistently, which means that the object can still be accessed in the next sub sequent project launches even if after the method call is removed.
Storing value
UserDefaults.standard.set(1000, forKey: "item1")
It's recommended that the value should be as simple as possible for better performance even though the Data type is supported. The value of a primitive type would be ideal.
Getting value
UserDefaults.standard.integer(forKey: "item1")
If the object does not exist, the returned value falls back to the default value of its corresponding type. It would be 0 (zero) in the case above (, and false in case it's Bool)
The system searches for the key in all domains one by one based on their orders listed above until the key is found.
Registering default value for certain key
func application(_ application: UIApplication, didFinishLaunchingWithOptions launchOptions: [UIApplicationLaunchOptionsKey: Any]?) -> Bool {
 let preferences = ["item1", -1]
 UserDefaults.standard.register(defaults: preferences)
}
References
https://developer.apple.com/library/archive/documentation/Cocoa/Conceptual/UserDefaults/AboutPreferenceDomains/AboutPreferenceDomains.html#//apple_ref/doc/uid/10000059i-CH2-SW6
Thursday, April 4, 2019
Animation: moving contents with constraints in Swift
I'm developing a pet project, named MyCalculator, using Swift 3. In portrait mode, the app shows only the basic operation buttons but when the user swipes to right, the basic operation buttons should slide out and the advance operation buttons should slide in as shown in the image below.

I put the basic operation buttons in one stackview and the advanced operation buttons in another stackview. Then, I put those two stackviews in another stackview together, named Buttons Stack View. I added two constraints for the Buttons Stack View to define its leading edge and trailing edge equal to the ViewController's view's leading edge and trailing edge, respectively.

To make the basic operation buttons disappear and the advanced operation buttons appear, I changed to constant property of the constraint as following:
But, I want to do more than that. i want to container stackview of those buttons move according to the user's finger movement point by point. This requires more effort and I put it in the steps below.
Create outlets for the Buttons Stack View and it's leading and trailing constraints as following:
Then add the following method:
And add this helper method too
The recognizer.velocity() method below returns the number of points per second in which the user has swiped the screen. The amount of points the user has swiped across the screen might be only 30 but the velocity might be 3000 points per second.
We can also use AffineTransform struct to move the buttons as following:
I think if it's a slide-in popup view like in this post, using AfflineTransform is okay because the popup view usually stay on top of other views and it does not need constraints relative to the other views so changing its location and size does not really affect the others.

I put the basic operation buttons in one stackview and the advanced operation buttons in another stackview. Then, I put those two stackviews in another stackview together, named Buttons Stack View. I added two constraints for the Buttons Stack View to define its leading edge and trailing edge equal to the ViewController's view's leading edge and trailing edge, respectively.

To make the basic operation buttons disappear and the advanced operation buttons appear, I changed to constant property of the constraint as following:
self.buttonsStackviewLeading.constant = self.buttonsStackviewLeading.constant + view.bounds.width
self.buttonsStackviewTrailing.constant = self.buttonsStackviewTrailing.constant + (-1 * view.bounds.width)
1. Create required outlets
    @IBOutlet weak var buttonsStackView: UIStackView!
    @IBOutlet weak var buttonsStackviewLeading: NSLayoutConstraint!
    @IBOutlet weak var buttonsStackviewTrailing: NSLayoutConstraint!
2. Initializing UIPanGestureRecognizer
- Add the following lines to the ViewController's viewDidLoad() method.
let panGestureRecognizer = UIPanGestureRecognizer()
panGestureRecognizer.addTarget(self, action: #selector(panGestureHandler(_:)))
buttonsStackView.addGestureRecognizer(panGestureRecognizer)
3. Handle the Pan Gesture Recognizer
Add these properties to the ViewController
    private var beganPoint:CGPoint?
    private var previousPoint:CGPoint?
    private var beganStackviewFrameMinX:CGFloat?
    private var beganStackviewFrameMaxX:CGFloat?
    private static let swipeFastMinPointsPerSecond = CGFloat(400)
    private static let maxPointsToMoveWhenSwipeFast = CGFloat(20)
Then add the following method:
    @objc public func panGestureHandler(_ recognizer:UIPanGestureRecognizer) {
        // Don't use UIDevice.current.orientation.isLandscape here
        // because its value can be 'flat (face-up or face-down)'
        // then the user would still be able to swipe when the app's UI is in landscape.
        if UIApplication.shared.statusBarOrientation.isLandscape {
            return
        }

        let currentPoint = recognizer.translation(in: view)
        let halfScreenWidth = view.bounds.width / 2

        if recognizer.state == .began {
            previousPoint = currentPoint
            beganStackviewFrameMinX = buttonsStackView.frame.minX
            beganStackviewFrameMaxX = buttonsStackView.frame.maxX
        } else if recognizer.state == .changed {
            var changedPointsDiff = currentPoint.x - (previousPoint?.x)!
            previousPoint = currentPoint

            if swipedFast(recognizer) {
                changedPointsDiff = recognizer.velocity(in: view).x < 0 ? (-1 * ViewController.maxPointsToMoveWhenSwipeFast) : ViewController.maxPointsToMoveWhenSwipeFast
            }

            // If in case like the basic buttons are showing
            // and the user swipes/drags from right to left,
            if beganStackviewFrameMinX! == view.bounds.minX && buttonsStackviewLeading.constant > halfScreenWidth
                || beganStackviewFrameMaxX! == view.bounds.maxX && buttonsStackviewTrailing.constant > halfScreenWidth {

                // so the user can't drag those buttons more than half the screen
                return
            }

            buttonsStackviewLeading.constant = buttonsStackviewLeading.constant + changedPointsDiff
            buttonsStackviewTrailing.constant = buttonsStackviewTrailing.constant + (-1 * changedPointsDiff)
        } else if recognizer.state == .ended {

            let totalPointsMoved = buttonsStackView.frame.minX - beganStackviewFrameMinX!
            var finalPointsToMove:CGFloat = -1 * totalPointsMoved // Should move back to original position by default

            let swipedPointsPerSecond = recognizer.velocity(in: view).x
            if swipedFast(recognizer) {

                // When the user swipes fast, slide in advanced buttons or basic buttons.
                // It doesn't have to be a long swipe/drag.
                if beganStackviewFrameMinX! == view.bounds.minX && swipedPointsPerSecond < 0 {
                    finalPointsToMove = -1 * view.bounds.width - totalPointsMoved
                } else if beganStackviewFrameMaxX! == view.bounds.maxX && swipedPointsPerSecond > 0 {
                    finalPointsToMove =  view.bounds.width - totalPointsMoved
                }
            } else if beganStackviewFrameMinX == view.bounds.minX && totalPointsMoved > 0
                || beganStackviewFrameMaxX == view.bounds.maxX && totalPointsMoved < 0
                || abs(totalPointsMoved) < halfScreenWidth {

                // If the basic buttons are showing and the user swiped to left,
                // just move them to left a little bit and then move them back to the original position.
                finalPointsToMove = -1 * totalPointsMoved
            } else if abs(totalPointsMoved) > halfScreenWidth {

                // If dragged more than half the screen width,
                // show advanced/basic buttons
                finalPointsToMove = view.bounds.maxX - abs(totalPointsMoved)
                finalPointsToMove = totalPointsMoved > 0 ? finalPointsToMove : -1 * finalPointsToMove
            }

            self.buttonsStackviewLeading.constant = self.buttonsStackviewLeading.constant + finalPointsToMove
            self.buttonsStackviewTrailing.constant = self.buttonsStackviewTrailing.constant + (-1 * finalPointsToMove)
            UIView.animate(withDuration: 0.3, animations: {
                self.view.layoutIfNeeded()
            }, completion: {(finished:Bool) in
                if finished {
                    if self.buttonsStackviewLeading.constant >= 0 {
                        self.showedAdvancedOperationsInPortrait = true
                    } else {
                        self.showedAdvancedOperationsInPortrait = false
                    }
                }
            })
        }
    }
And add this helper method too
    private func swipedFast(_ recognizer:UIPanGestureRecognizer) -> Bool {
        return abs(recognizer.velocity(in: view).x) > ViewController.swipeFastMinPointsPerSecond
    }
The recognizer.velocity() method below returns the number of points per second in which the user has swiped the screen. The amount of points the user has swiped across the screen might be only 30 but the velocity might be 3000 points per second.
Note (AffineTransform)
We can also use AffineTransform struct to move the buttons as following:
buttonsStackView.transform = buttonsStackView.transform.translatedBy(x: pointsToMove, y: buttonsStackView.frame.minY)
But, using AffineTranform does not affect any constraints then it would be very hard to manage as the constraints and the AffineTransform might be conflicted with each other. I tried it in my example project too and it didn't work well. I had constraints to change the location of the stackview according to the screen's orientation. Using the AffineTransform struct worked in portrait mode but when the screen rotated to landscape, some buttons went off the screen.I think if it's a slide-in popup view like in this post, using AfflineTransform is okay because the popup view usually stay on top of other views and it does not need constraints relative to the other views so changing its location and size does not really affect the others.
How to detect device's orientation in Swift
There are two ways to detect a device's orientation:
1). The UIDevice.current.orientation property (instance of UIDeviceOrientation class:
- isFlat: when the device is held upward (toward the sky) or downward (toward the ground)
- isLandscape: when the device is held upright and the home button is on the right/left
- isPortrait: when the device is held upright and the home button is at the bottom/top
2). The UIApplication.shared.statusBarOrientation property:
- isLandscape
- isPortrait

Using Swift 3, the status bar is hidden by default in my app. However, the isLandscape and isPortrait still work correctly.
Which one should we use?
It depends on circumstances. In my case, I want to enable swipe gesture in portrait mode but disable it in landscape mode so UIApplication.shared.statusBarOrientation.isLandscape is the right one. If my device is firstly in landscape mode and then i put it on the table (face up), the swipe gesture should still be disable. The UIDevice.current.orientation.isLandscape property would return false and then the user would be able to swipe.
Monday, April 1, 2019
Swift: Dynamically Change A Label's Font Size Based On Device's Screen Size
Different devices have different screen sizes or resolutions, for example, iPhone SE has 640x1136 resolution (pixels) but iPhone 6 has 750x1334 resolution (pixels). We can use UIKit framework to obtain information about the screen resolutions.
Points are logical unit used in iOS. The number of pixels per point varies from devices. The more pixels per point, the clearer the icons and texts.

When developing an app to run on different devices, the text's size must be able to dynamically change or the text might look fine on one device but looks too big or too small on another.
Below is a custom label in which its font can change based on the device's screen size.
The idea here is we need to test the label's font on a preferred device first to see it look ok. In my case, I chose iPhone 6, and the font size 21 looks perfect on it.
Then, I noted down the iPhone 6's screen size in points so that i can calculate the screen size difference (in points) between the iPhone 6 and the current device the app is running on. The font size is recalculated based on the screen difference.
Points are logical unit used in iOS. The number of pixels per point varies from devices. The more pixels per point, the clearer the icons and texts.
When developing an app to run on different devices, the text's size must be able to dynamically change or the text might look fine on one device but looks too big or too small on another.
Below is a custom label in which its font can change based on the device's screen size.
import Foundation
import UIKit

public class AdaptiveFontLabel: UILabel {
    private let iphone6HeightInPoints:CGFloat = 667

    var utfText:String?

    public required init?(coder aDecoder: NSCoder) {
        super.init(coder: aDecoder)

        // On landscape mode, height is less than width
        let heightDiff = max(UIScreen.main.bounds.height, UIScreen.main.bounds.width) / iphone6HeightInPoints
        let newFontSize = font.pointSize * heightDiff

        font = UIFont(descriptor: font.fontDescriptor, size: newFontSize)
    }

    private func max(_ first:CGFloat, _ second:CGFloat) -> CGFloat {
        return first > second ? first : second
    }
}
The idea here is we need to test the label's font on a preferred device first to see it look ok. In my case, I chose iPhone 6, and the font size 21 looks perfect on it.
Then, I noted down the iPhone 6's screen size in points so that i can calculate the screen size difference (in points) between the iPhone 6 and the current device the app is running on. The font size is recalculated based on the screen difference.
The View's Margins in iOS
The top, leading, bottom, and trailing margins of a view define the spaces between the view's edges and its contents.

The margins can be set in Interface Builder by updating the Layout Margins setting (in Size Inspector) to either Language Directional or Fixed then specify the values for Leading, Top, Bottom, and Trailing edges.

Then, we can create a constraint for the subview's edges relative to superview's margins as following:

Note that if we don't check the "Constraint to margins", it means we constraint the subview's edges relatively to its superview's edges, not the layout margins.
Open the ViewController.swift file and update the viewDidLoad() method as following:

Setting layout margins in Interface Builder
The margins can be set in Interface Builder by updating the Layout Margins setting (in Size Inspector) to either Language Directional or Fixed then specify the values for Leading, Top, Bottom, and Trailing edges.


Note that if we don't check the "Constraint to margins", it means we constraint the subview's edges relatively to its superview's edges, not the layout margins.
Setting layout margins programmatically
Open the ViewController.swift file and update the viewDidLoad() method as following:
import UIKit

class SecondViewController: UIViewController {

    @IBOutlet weak var view1: UIView!

    override func viewDidLoad() {
        let layoutMarginGuide = self.view.layoutMarginsGuide
        view1.leadingAnchor.constraint(equalTo: layoutMarginGuide.leadingAnchor).isActive = true
        view1.topAnchor.constraint(equalTo: layoutMarginGuide.topAnchor).isActive = true
        view1.trailingAnchor.constraint(equalTo: layoutMarginGuide.trailingAnchor).isActive = true
        view1.bottomAnchor.constraint(equalTo: layoutMarginGuide.bottomAnchor).isActive = true
        view1.translatesAutoresizingMaskIntoConstraints = false
    }
}
Auto layout and Constraints in iOS
Layout is the way in which the UI components (UIView, UIButton, UILabel) are arranged together. Auto layout means the UI components dynamically change their sizes and positions according to external or internal changes such as the screen rotates. We have to define constraints for those UI components either in Interface Builder or programmatically so that they know how to change in different situations. For example, we can set a constraint for a button to always stay in the center of the screen both horizontally and vertically.
We must set enough constraints for each UI control added or we will get unexpected result like the control shows up in portrait mode but doesn't in landscape mode.
How to know what constraints should be set? It's based on circumstances. Logically, the system must know the UI control's position and size so the constraint should tell enough information about the size and position. However, if we specify constraints for the top, leading, bottom, and trailing edges of an image view equal to its superview's, we don't have to specify its size because that's enough for the system to know its size. its size will always be the same as its superview's size.

Traditionally, without auto layout, the developers must calculate the size and position of a view's frame and its subview's frame. Then, when the screen's size changes, they have to recalculate the frame's sizes and positions for the view and its subviews.
1). Drag a UIView object from the Object Library and drop it in the View Controller's view.

2). Control-drag the subview to the ViewController's view and select "Leading Space to Safe Area" from the popup.


Then, select the subview and open the Size Inspector and the leading constraint would appear there.

In my case, the leading space is 62 because I dropped the subview at that position. We can change it though by selecting the constraint in the Size Inspector and click Edit then update the Constant to 0 so that the subview's leading edge equal to the superview's leading edge.
3). Repeat Step 2 to set 3 more constraints for the subview by selecting "Top Space to Safe Area", "Trailing Space to Safe Area", and "Bottom Space to Safe Area" when the pop up appears. The image below shows the result of this step.

It's finished for our purpose here. The subview will dynamically change its size to maintain the defined spaces between its edges and the superview's.
1). Control-drag the subview to the SecondViewController.swift in my case, to create an outlet so that we can access the subview from code

2). The constraints should be set in ViewController's viewDidLoaded() method as following:
The leadingAnchor, topAnchor, trailingAnchor, and bottomAnchor properties represent the leading, top, trailing, and bottom edges of the view's frame, respectively.
Note that if we have the constraints set both in Interface Builder and programmatically, the ones in Interface Builder take effect. If we want to programmatically modify the constraints defined in Interface Builder, we have to create the outlets connected the constraints from Interface Builder and modify them in viewDidLoad() method.
Layout Margins
We can define the constraints relative to the superview's margin instead. See here for more details.
We must set enough constraints for each UI control added or we will get unexpected result like the control shows up in portrait mode but doesn't in landscape mode.
How to know what constraints should be set? It's based on circumstances. Logically, the system must know the UI control's position and size so the constraint should tell enough information about the size and position. However, if we specify constraints for the top, leading, bottom, and trailing edges of an image view equal to its superview's, we don't have to specify its size because that's enough for the system to know its size. its size will always be the same as its superview's size.

Traditionally, without auto layout, the developers must calculate the size and position of a view's frame and its subview's frame. Then, when the screen's size changes, they have to recalculate the frame's sizes and positions for the view and its subviews.
Adding Constraints in Interface Builder
1). Drag a UIView object from the Object Library and drop it in the View Controller's view.

2). Control-drag the subview to the ViewController's view and select "Leading Space to Safe Area" from the popup.


Then, select the subview and open the Size Inspector and the leading constraint would appear there.

In my case, the leading space is 62 because I dropped the subview at that position. We can change it though by selecting the constraint in the Size Inspector and click Edit then update the Constant to 0 so that the subview's leading edge equal to the superview's leading edge.
3). Repeat Step 2 to set 3 more constraints for the subview by selecting "Top Space to Safe Area", "Trailing Space to Safe Area", and "Bottom Space to Safe Area" when the pop up appears. The image below shows the result of this step.

It's finished for our purpose here. The subview will dynamically change its size to maintain the defined spaces between its edges and the superview's.
Adding Constraints Programmatically
1). Control-drag the subview to the SecondViewController.swift in my case, to create an outlet so that we can access the subview from code

import UIKit

class SecondViewController: UIViewController {

    @IBOutlet weak var view1: UIView!

    override func viewDidLoad() {
        view1.leadingAnchor.constraint(equalTo: self.view.leadingAnchor).isActive = true
        view1.topAnchor.constraint(equalTo: self.view.topAnchor).isActive = true
        view1.trailingAnchor.constraint(equalTo: self.view.trailingAnchor).isActive = true
        view1.bottomAnchor.constraint(equalTo: self.view.bottomAnchor).isActive = true
        view1.translatesAutoresizingMaskIntoConstraints = false
    }
}
The leadingAnchor, topAnchor, trailingAnchor, and bottomAnchor properties represent the leading, top, trailing, and bottom edges of the view's frame, respectively.
Note that if we have the constraints set both in Interface Builder and programmatically, the ones in Interface Builder take effect. If we want to programmatically modify the constraints defined in Interface Builder, we have to create the outlets connected the constraints from Interface Builder and modify them in viewDidLoad() method.
Layout Margins
We can define the constraints relative to the superview's margin instead. See here for more details.
Introduction to UIViewController
Normally, every app has at least one view controller (an instance of UIViewController class). Each view controller has one root view (an instance of UIView class). Commonly, one view controller manages one page.
View Controller's responsibilities:
- Updating the contents of the views
- Responding to user interactions with the views
- Resizing the views and managing the overall interface
- Coordinating with other objects, including other view controllers, in your app.
When creating Single View Application project, Xcode adds a view controller by default. The page or view that the view controller manages can be designed in the Storyboard (Main.storyboard file). For any additional setups for or actions to do responding to the user's interactions with the views in the page can be programmatically done in the corresponding ViewController.swift file. The ViewController class is connected to the view controller in the Storyboard through Class setting in Identity Inspector.

View Controller's Lifecycle

There are a bunch of methods, for example viewWillAppear(), are called according to its state. Usually, the property initializations are done in viewDidLoad() method. Note that any operations related to the view's or the subview's bounds property should be done in viewDidAppear() method because that's when the value of the bounds property is finalized. However, if there is a delay in the view rending and it does not look good to the user, the operations can be done in viewWillAppear() method instead but the layoutIfNeeded() method must be called first so that the system will layout any pending views and then you get the correct value of the bounds property.
Embedding A View Controller's Root View in Another View Controller's View
Thursday, March 28, 2019
Xcode eats up spaces (more than 10 GB)
Once in a while, I got prompted that my disk is running out of spaces. As I'm developing an iOS app using Xcode almost everyday, Xcode can be the culprit.
1). This step alone will claim several Gigabytes of disk space back.
2). Remove the oldest directories as many as possible
References
https://stackoverflow.com/questions/36239242/xcode-7-3-taking-too-much-space
1). This step alone will claim several Gigabytes of disk space back.
> cd ~/Library/Developer/Xcode/DerivedData
> sudo rm -Rf *
2). Remove the oldest directories as many as possible
> cd ~/Library/Developer/Xcode/DerivedData/Devices
> ls -lh

total 24
drwxr-xr-x@ 4 vathanakmao  staff   136B Jul 21  2018 010C03D5-989F-4220-879E-023F62601A35
drwxr-xr-x@ 4 vathanakmao  staff   136B Jul 21  2018 05589345-6168-4338-9205-A42BF0C0A30C
drwxr-xr-x@ 5 vathanakmao  staff   170B Nov 27 11:13 0D1069CC-C10F-4D31-BB6E-62AF44C5107E
drwxr-xr-x@ 4 vathanakmao  staff   136B Jun 16  2017 0DF311E9-5E61-47CB-BBEA-6E8FEFC022C9
drwxr-xr-x@ 5 vathanakmao  staff   170B Nov 27 11:13 1115F8DE-BD11-4AD7-AC58-AC217D038CC5
drwxr-xr-x@ 4 vathanakmao  staff   136B Jun 26  2017 13145874-EE01-4E68-AA71-4912D6CF587F
drwxr-xr-x@ 4 vathanakmao  staff   136B Jun 26  2017 154CDEA7-17B5-4352-9603-FE8D6A788F2B
drwxr-xr-x@ 4 vathanakmao  staff   136B Dec 26  2016 15813813-54E7-4D77-8B2B-44B9C9105D73
drwxr-xr-x@ 4 vathanakmao  staff   136B Jul 21  2018 15A9EFFC-8718-4165-B3E9-C72F168511D6
drwxr-xr-x@ 4 vathanakmao  staff   136B Jul 21  2018 233E4A23-6956-4945-A7C8-86E6A7F1C1E5
drwxr-xr-x@ 4 vathanakmao  staff   136B Jun 16  2017 2B44F99E-858D-4AEC-BB3F-B816F27848D9
drwxr-xr-x@ 4 vathanakmao  staff   136B Jun 16  2017 2D27D8AE-26BC-423E-B6D7-7C327D9DA042
drwxr-xr-x@ 4 vathanakmao  staff   136B Jul 21  2018 2F6CEB95-74ED-489E-BBE3-AC8DFF766E79
...
References
https://stackoverflow.com/questions/36239242/xcode-7-3-taking-too-much-space
Tuesday, March 26, 2019
Introduction to UIView
A UIView is an object that manages the content for a rectangular on the screen. There are many kinds of view such as window, button, label and so on.
The method is called whenever the bounds property changes so the developers should override this method to do any UI updates as needed. This method should not be called directly. If we need the view to layout its contents immediately, we should call either setNeededLayout() method or layoutIfNeeded() method.
The example below shows how to create a button with surrounding borders.
Here is the complete codes of how to add a border to a view.
A view (UIView) contains at least one layer (CALayer). A CALayer object is responsible for drawing and animate the content. Any objects (UIView, UIButton, or UILabel) added to a UIView object (either in Interface Builder or programmatically) are drawn on the root layer by default.
Like UIView, CALayer also have frame, bounds, and backgroundColor properties. The values of those properties of a UIView object and its root CALayer object always match. Any changes on the view's property have effect on the matching property of the root layer.


A view has margins to define spaces between its content and its top, left, bottom, and right edges. For more details, go to this post.
A view can layout its contents dynamically (automatically) based on a predefined constraint. Go to this post for more details.
The bounds and frame properties
A UIView is initialized with a frame rectangle. The frame property, represented the frame rectangle, defines the view's size and position in its superview's coordinate system. The bounds property defines the view's size and position in its own coordinate system.


The bounds property is set to the frame property's value during the initialization. If the bounds changes, the frame changes too.

When to use them?
The frame property is used when resizing or moving the view in its superview. The bounds property is used to draw (set the position and size of) the view's content.
The layoutSubviews() method
The example below shows how to create a button with surrounding borders.
import Foundation
import UIKit

class BorderButton : CustomButton {

    @IBInspectable var inset:Bool = true {
        didSet {
            setNeedsLayout()
        }
    }

    @IBInspectable var bottomBorder: CGFloat = 1 {
        didSet {
            setNeedsLayout()
        }
    }

    @IBInspectable var rightBorder: CGFloat = 1 {
        didSet {
            setNeedsLayout()
        }
    }

    @IBInspectable var leftBorder: CGFloat = 1 {
        didSet {
            setNeedsLayout()
        }
    }

    @IBInspectable var topBorder: CGFloat = 1 {
        didSet {
            setNeedsLayout()
        }
    }

    @IBInspectable var borderColor: UIColor = UIColor.lightGray {
        didSet {
            setNeedsLayout()
        }
    }

    public override func layoutSubviews() {
        super.layoutSubviews()

        ViewUtil.setBorders(view: self, top: topBorder, bottom: bottomBorder, left: leftBorder, right: rightBorder, color: borderColor, inset: inset)
    }
}
Here is the complete codes of how to add a border to a view.
Layer (CALayer)
Like UIView, CALayer also have frame, bounds, and backgroundColor properties. The values of those properties of a UIView object and its root CALayer object always match. Any changes on the view's property have effect on the matching property of the root layer.

Sub Layer
The root layer of a view can have one or more sub layers. To add a sub layer, call UIView.layer.addSublayer() method. After adding a sub layer, any new objects you programmatically add to the view (by calling view.addSubview() method) are drawn on the sub layer. By default, the sublayer's backgroundColor property is nil and size is zero but its content still appear in the view. This is the purpose of the layer. If the sublayer and the root layer have the same frame's sizes and the sublayer's backgroundColor is set to yellow, for example, the root layer and its content completely disappear.
Layout Margins
A view has margins to define spaces between its content and its top, left, bottom, and right edges. For more details, go to this post.
Auto Layout and Constraints
A view can layout its contents dynamically (automatically) based on a predefined constraint. Go to this post for more details.
Monday, March 25, 2019
Highlight the selected cell in UICollectionView
This post is based on Xcode 9 and Swift 3. By default, when a user touches an item or a cell of a UICollectionView, some properties are updated and some events are triggered but there is no any UIs updated. It's the developer's job to update the UIs.
In the page below, there are a collection of themes displaying. When a user touches a theme, I want to show a green rectangle around it.

In the ViewController class, the UICollectionView.allowsMultipleSelection property should be set to false so that the user can select only one item/cell. When the user touches a cell, its isSelected property is set to true so the code to update the UIs for the cell should be done in the didSet block of the property as following:
In case there is an item (cell) to be selected by default, the selectItem() method should be called in the ViewController.viewDidAppear() method to take effect then the isSelected property of the selected cell will be set to true.
Here is an example of how to add the borders to a stack view.
In the page below, there are a collection of themes displaying. When a user touches a theme, I want to show a green rectangle around it.

class ThemeCollectionViewCell: UICollectionViewCell {
    ...

    @IBOutlet weak var rootStackView: UIStackView!

    override var isSelected:Bool {
        didSet {
            if isSelected {
                rootStackView.addBorders()
            } else {
                rootStackView.removeBorders()
            }
        }
    }
}
In case there is an item (cell) to be selected by default, the selectItem() method should be called in the ViewController.viewDidAppear() method to take effect then the isSelected property of the selected cell will be set to true.
Here is an example of how to add the borders to a stack view.
Add borders to a stackview
This post is based on Xcode 9 and Swift 3. I used UIStackView to divide the page into different sections with gray borders as shown in the image below.

I created a custom UIStackView class named BorderStackView as followings:
To remove a border, for example the top border, set topBorder property either programmatically or in Interface Builder to zero.
When the inset property is true, the borders are drawn inside the stackview's frame. Otherwise, they are drawn outside the frame.
And here is the body of the ViewUtil class:

I created a custom UIStackView class named BorderStackView as followings:
import Foundation
import UIKit

class BorderStackView : UIStackView {

    @IBInspectable var inset:Bool = true {
        didSet {
            setNeedsLayout()
        }
    }

    @IBInspectable var bottomBorder: CGFloat = 1 {
        didSet {
            setNeedsLayout()
        }
    }

    @IBInspectable var rightBorder: CGFloat = 1 {
        didSet {

            setNeedsLayout()
        }
    }

    @IBInspectable var leftBorder: CGFloat = 1 {
        didSet {
            setNeedsLayout()
        }
    }

    @IBInspectable var topBorder: CGFloat = 1 {
        didSet {
            setNeedsLayout()
        }
    }

    @IBInspectable var borderColor: UIColor = UIColor.lightGray {
        didSet {
            setNeedsLayout()
        }
    }

    public override func layoutSubviews() {
        super.layoutSubviews()

        ViewUtil.setBorders(view: self, top: topBorder, bottom: bottomBorder, left: leftBorder, right: rightBorder, color: borderColor, inset: inset)
    }

}
To remove a border, for example the top border, set topBorder property either programmatically or in Interface Builder to zero.
When the inset property is true, the borders are drawn inside the stackview's frame. Otherwise, they are drawn outside the frame.
And here is the body of the ViewUtil class:
import Foundation
import UIKit

class ViewUtil {
    private static let layerNameTopBorder = "topBorder"
    private static let layerNameBottomBorder = "bottomBorder"
    private static let layerNameLeftBorder = "leftBorder"
    private static let layerNameRightBorder = "rightBorder"

    static func setBorders(view: UIView, top topWidth: CGFloat, bottom bottomWidth: CGFloat, left leftWidth: CGFloat, right rightWidth: CGFloat, color: UIColor,inset:Bool = true) {
        var topBorderLayer:CALayer?
        var bottomBorderLayer:CALayer?
        var leftBorderLayer:CALayer?
        var rightBorderLayer:CALayer?
        for borderLayer in (view.layer.sublayers)! {
            if borderLayer.name == layerNameTopBorder {
                topBorderLayer = borderLayer
            } else if borderLayer.name == layerNameRightBorder {
                rightBorderLayer = borderLayer
            } else if borderLayer.name == layerNameLeftBorder {
                leftBorderLayer = borderLayer
            } else if borderLayer.name == layerNameBottomBorder {
                bottomBorderLayer = borderLayer
            }
        }


        // top border
        if topBorderLayer == nil {
            topBorderLayer = CALayer()
            topBorderLayer!.name = layerNameTopBorder
            view.layer.addSublayer(topBorderLayer!)
        }
        if inset {
            topBorderLayer!.frame = CGRect(x: view.bounds.minX, y: view.bounds.minY, width: view.bounds.width, height: topWidth)
        } else {
            topBorderLayer!.frame = CGRect(x: view.bounds.minX - leftWidth, y: view.bounds.minY - topWidth, width: view.bounds.width + leftWidth + rightWidth, height: topWidth)
        }
        topBorderLayer!.backgroundColor = color.cgColor


        // bottom border
        if bottomBorderLayer == nil {
            bottomBorderLayer = CALayer()
            bottomBorderLayer!.name = layerNameBottomBorder
            view.layer.addSublayer(bottomBorderLayer!)
        }
        if bottomWidth >= 0 {
            if inset {
                bottomBorderLayer!.frame = CGRect(x: view.bounds.minX, y:view.bounds.size.height - bottomWidth, width:view.bounds.size.width, height: bottomWidth)
            } else {
                bottomBorderLayer!.frame = CGRect(x: view.bounds.minX - leftWidth, y:view.bounds.size.height, width:view.bounds.size.width + leftWidth + rightWidth, height: bottomWidth)
            }
            bottomBorderLayer!.backgroundColor = color.cgColor
        }


        // left border
        if leftBorderLayer == nil {
            leftBorderLayer = CALayer()
            leftBorderLayer!.name = layerNameLeftBorder
            view.layer.addSublayer(leftBorderLayer!)
        }
        if inset {
            leftBorderLayer!.frame = CGRect(x: view.bounds.minX, y: view.bounds.minY, width: leftWidth, height: view.bounds.height)
        } else {
            leftBorderLayer!.frame = CGRect(x: view.bounds.minX - leftWidth, y: view.bounds.minY, width: leftWidth, height: view.bounds.height)
        }
        leftBorderLayer!.backgroundColor = color.cgColor


        // right border
        if rightBorderLayer == nil {
            rightBorderLayer = CALayer()
            rightBorderLayer!.name = layerNameRightBorder
            view.layer.addSublayer(rightBorderLayer!)
        }
        if inset {
            rightBorderLayer!.frame = CGRect(x: view.bounds.width - rightWidth, y: 0, width: rightWidth, height: view.bounds.height)
        } else {
            rightBorderLayer!.frame = CGRect(x: view.bounds.width, y: 0, width: rightWidth, height: view.bounds.height)
        }
        rightBorderLayer!.backgroundColor = color.cgColor
    }

}
Monday, March 18, 2019
Display images horizontally in a listbox with UICollectionView
I'm using Xcode 9 and swift 3 to developing a pet project. It requires showing a list of images horizontally at the bottom of the screen as shown in the image below.

- Drag UICollectionView from the Object Library and drop it on the View Controller and set appropriate constraints (related to its superview).
- Drag UIImageView from the Object Library and drop it on the UICollectionViewCell come with the UICollectionView object and set appropriate constraints related to the UICollectionViewCel. (Don't set constraints for the UICollectionViewCell)
- Select File menu > New > File...
- Select Cocoa Touch Class and click Next
- Set "Class" to ImageCollectionViewCell then "Subclass of" to UICollectionViewCell and make sure the "Also create XIB file" checkbox is unchecked cause we don't need it.
- Open ImageCollectionViewCell.swift file and create an outlet connected to the UIImageView control added in the step above.
- Within the storyboard, select the UICollectionViewCell control then open Identity Inspector and set Class under Custom Class section to ImageCollectionViewCell. After that, open Attributes Inspector and set Identifier under Collection Reusable View section to ImageCollectionViewCell.
Create an outlet connected the UICollectionView control in the Interface Builder to the ViewController class and update it as following:
Note that any operations related to the sizes of cell's subviews should not be done in those methods of UICollectionViewCellDelegate because the frame and bounds properties are not finalized yet. Do it in layoutSubviews() method of the cell instead.
Setting the size of the cell in the method below does not have any effects.
The ViewController must conform to UICollectionViewDelegateFlowLayout protocol and implement its methods.
The code snippets below is an example of how to set the size of a cell:
This is an example of how to set the space between cell in the same row:
The example below tells how to set the space between the collection view and its contents:
References
https://www.youtube.com/watch?v=SL1ZmIp83iI

1. Add UICollectionView in Interface Builder
- Drag UICollectionView from the Object Library and drop it on the View Controller and set appropriate constraints (related to its superview).
- Drag UIImageView from the Object Library and drop it on the UICollectionViewCell come with the UICollectionView object and set appropriate constraints related to the UICollectionViewCel. (Don't set constraints for the UICollectionViewCell)
2. Create a custom UICollectionViewCell class
- Select File menu > New > File...
- Select Cocoa Touch Class and click Next
- Set "Class" to ImageCollectionViewCell then "Subclass of" to UICollectionViewCell and make sure the "Also create XIB file" checkbox is unchecked cause we don't need it.
- Open ImageCollectionViewCell.swift file and create an outlet connected to the UIImageView control added in the step above.
import UIKit

class ImageCollectionViewCell: UICollectionViewCell {

    @IBOutlet weak var imageView: UIImageView!
}
- Within the storyboard, select the UICollectionViewCell control then open Identity Inspector and set Class under Custom Class section to ImageCollectionViewCell. After that, open Attributes Inspector and set Identifier under Collection Reusable View section to ImageCollectionViewCell.
3. Make the ViewController class conform to UICollectionViewDelegate and UICollectionViewDataSource
Create an outlet connected the UICollectionView control in the Interface Builder to the ViewController class and update it as following:
import Foundation
import UIKit

public class ViewController : UIViewController, UICollectionViewDelegate, UICollectionViewDataSource {

    @IBOutlet weak var collectionView: UICollectionView!

    private var images = [
        UIImage(named:"theme_1"),
        UIImage(named:"theme_2"),
        UIImage(named:"theme_3"),
        UIImage(named:"theme_4")
    ]

    public override func viewDidLoad() {
        collectionView.delegate = self
        collectionView.dataSource = self
    }

    public func collectionView(_ collectionView: UICollectionView, numberOfItemsInSection section: Int) -> Int {
        return images.count
    }

    public func collectionView(_ collectionView: UICollectionView, cellForItemAt indexPath: IndexPath) -> UICollectionViewCell {
        let cell = collectionView.dequeueReusableCell(withReuseIdentifier: "ImageCollectionViewCell", for: indexPath) as! ImageCollectionViewCell
        cell.imageView.image = images[indexPath.row]
        return cell
    }

}
Note that any operations related to the sizes of cell's subviews should not be done in those methods of UICollectionViewCellDelegate because the frame and bounds properties are not finalized yet. Do it in layoutSubviews() method of the cell instead.
Setting the size of the cell in the method below does not have any effects.
public func collectionView(_ collectionView: UICollectionView, cellForItemAt indexPath: IndexPath) -> UICollectionViewCell {
}
Setting the size of each cell and space between them
The ViewController must conform to UICollectionViewDelegateFlowLayout protocol and implement its methods.
The code snippets below is an example of how to set the size of a cell:
    public func collectionView(_ collectionView: UICollectionView, layout collectionViewLayout: UICollectionViewLayout, sizeForItemAt indexPath: IndexPath) -> CGSize {
        // The height and width of the container view (stackview)
        // of the four buttons in the cell (xib file)
        // should be the same to make them look completely circles.
        // Then, the cell's width should be equal to cell's height
        // plus the tick buttons's width.
        // We have a constraint in the IB to define the tick button's width
        // equal to one-fourth width of the container view
        // so this size will fit them right.
        let cellHeight = collectionView.bounds.height - 10
        let tickButtonWidth = cellHeight / 4
        let cellWidth = tickButtonWidth + cellHeight
        return CGSize(width: cellWidth, height: cellHeight)
    }
This is an example of how to set the space between cell in the same row:
    public func collectionView(_ collectionView: UICollectionView, layout collectionViewLayout: UICollectionViewLayout, minimumLineSpacingForSectionAt section: Int) -> CGFloat {
        return 25
    }
The example below tells how to set the space between the collection view and its contents:
    public func collectionView(_ collectionView: UICollectionView, layout collectionViewLayout: UICollectionViewLayout, insetForSectionAt section: Int) -> UIEdgeInsets {
        return UIEdgeInsets(top: 0, left: 10, bottom: 0, right: 10)
    }
References
https://www.youtube.com/watch?v=SL1ZmIp83iI
Subscribe to:
Posts (Atom)