Monday, October 29, 2018

Introduction to UIScrollView

The contents in your app might be cut off when they exceed the device's screen. Developers have to make them scrollable so the user can see all of the contents. For example, if you have a label (UILabel object) to display a hundred lines of article, you have to put it in a scroll view (UIScrollView object) so that the user can scroll up and down or left and right to see the whole article.

According to Apple's documentation, A scroll view (UIScrollView object) is a view whose origin is adjustable over the content view. It clips the contents to its frame and track the movement of fingers and adjust the origin accordingly. The origin refers to the original position on the screen.


Sample App


I'm developing a pet project called MyCalculator. The image below shows how I designed it in the Interface Builder (IB). I put the label named "Display Sub Section" to display the current operation the user's entering in a scroll view named "Display Sub Section Scroll View". The label for the current operation had a blue background but it did not show up in the image below because its size was zero by default at the design time without any constraints. Note that the scroll view had green background.


Then, I resized the label manually in IB.


But at runtime, the label didn't get wider even though its text was longer that its width, and so it couldn't be scrolled because the label's width is shorter than the scroll view's.


After that, I set constraints for the label's bottom, top, leading, and trailing equal to the scroll view's bottom, top, leading and trailing, respectively.


And it worked. I could scroll the label (blue background) left and right and the scroll indicator appeared but I had to enter the operation until it exceeded the screen's width first.


Note that the scroll view's contentSize.width property is greater than the scroll view's bounds.width property when the label's text exceeds the screen's width. Then, while you're scrolling, the scroll view adjust its origin to show part of the content accordingly.

Problem 1


I want to align the current operation the user's entering to the right as shown in the image below.


But, the content, the label, is left aligned by default when it's inside a scroll view. I cannot change it. It's the top-left corner of the scroll view's origin. When the current operation the user's entering exceeds the screen's width, the user will be able to scroll. I changed the Alignment setting of both the label and the scroll view but no effect. However, I found a workaround by rotating the scroll view as below.

displaySubSectionScrollView.transform = displaySubSectionScrollView.transform.rotated(by: CGFloat(Float.pi))
displaySubSection.transform = displaySubSection.transform.rotated(by: CGFloat(Float.pi))

This post explains in details about the rotated() method.


Introduction to UIStackView.Distribution.fillProportionally property

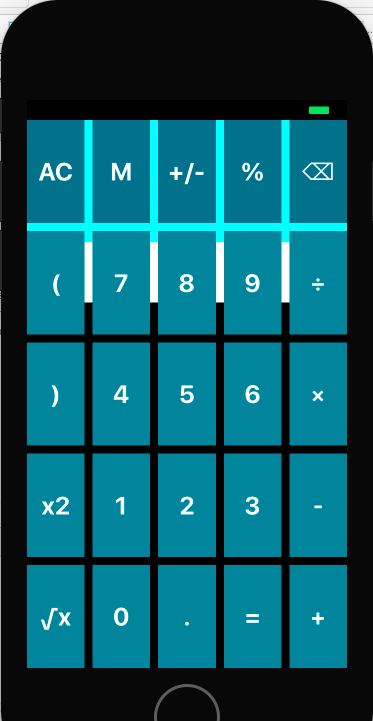
I've developed a pet project called MyCalculator, and the image below shows how its interface looked like.


I used stackviews to lay out the buttons and labels in rows. I used a root stackview, which contains two sub stackviews: one contains the labels to display the current operation and its result and another one contains all the digit and operator buttons.


First, I set the Distribution property of the root stackview to Fill Proportionally and defined a constraint to make the height of its first sub stackview proportionally smaller than its second sub stackview. Their height ratio is 2:6. I did it by Control+click the first stackview and drag to the second stackview then select Equal Heights from the popup menu. After that, I changed the Modifier in the constraint from 1 to 2:6.


Second, I set the Distribution property of the first stackview to Fill Proportionally because it contains two labels, one to display the entering operation and another one to display its result. The entering-operation label should be smaller than the result label. The system will display them based on their intrinsic content sizes (different font sizes, different intrinsic content sizes).

Third, I set the Distribution property of the second stackview to Fill Equally so that the digit and operator buttons have equal sizes. When using Fill Equally distribution, the system does not need to know the intrinsic content size of the stackview's contents. It can calculate the stackview's size based on the device screen's size.

Problem 1

The above solution worked well until I added a scroll view (UIScrollView) for the entering-operation label so that it's scrollable. But, the entering-operation label disappeared when I run the project.


 The reason that the label didn't show up is because the scroll view does not have intrinsic content size so the parent stackview can't calculate its height. I even switched the scroll view with a view (UIView object) and it still didn't work because the UIView object does not have intrinsic content size either. However, it worked when I replaced the scroll view with a stackview. It seems like the parent stackview can guess the inner stack view's size base on the size of its contents.


Then, I created a custom scroll view and override the intrinsicContentSize variable to return a value as following:

import Foundation
import UIKit

public class CustomScrollView : UIScrollView {
    
    @IBInspectable
    var height: CGFloat = 40.0
    
    public override var intrinsicContentSize : CGSize {
        return CGSize(width: 100, height: height)
    }
}

And it worked. However, the height of the entering-operation label is fixed to 40. I want it to dynamically scale according to the screen size so I added a constraint to define its height proportional to the result label's in the ratio of 2:4. Its height then scale dynamically according to the screen's size but the second sub stack view (we talked about above) stretched to the entire screen and overlapped it.


I don't know why. Logically, it should have worked because it did when there were only the two labels without the scroll view. I feel like the system didn't consider the first sub stackview when calculating the size of the second sub stackview.

What's interesting is the second sub stackview no longer overlapped the first sub stackview when I moved it up above the first sub stackview.


My assumption is the system calculated the size of the first sub stackview before the size of the second sub stackview as it found the first sub stack view from the array first. Then, the first sub stack view's size is included in the calculation of the second sub stackview's size.

But, why it worked when I used a stackview instead of a scroll view even if I didn't move the second sub stackview up, as I tested above? Perhaps, it was coded that way for the stackview in the UIKit. It tries to calculate the size of multiple hierarchical level stackview only when each container view is of type UIStackView.

Finally, I found a workaround. I created CustomStackView class by overriding the intrinsicContentSize variable to return any value similar to the CustomScrollView class above and then I modified the first sub stackview to be of type CustomStackView.


Monday, August 13, 2018

Synced MP3 File does not appear in iPhone

I'm using iPhone 6 and iOS 11.4. I used some online converter sites to convert a youtube URL to MP3 file and a local MP4 file to MP3/M4A file. Then, i added the converted file to iTune library to sync with my iPhone. After I've synced it, everything seemed fine cause the file appeared in the playlist i added it to on both iTune and the device. But, when i checked my iPhone, i couldn't see it in the Song section or the playlist i added it to.

At last, I could copy the file to my iPhone successfully by using a different converter site to convert the Youtube URL to MP3 file. The site is https://www.onlinevideoconverter.com/video-converter. I don't know why. I think the audio quality of the converted file is the culprit. The default audio quality that the site used is 192 kbps. For some other sites that didn't work showed 128 kbps for the output file.

Monday, July 30, 2018

Introduction to iOS Game Development

My First App


1). Open Xcode and select File > New > Project... then choose Game and click Next. I fill in the details and choose options for the next page as following.


Xcode will create a sample application, which set the background of the screen to black and display "Hello World" in the middle of it. Every time I tap on the screen, a small square appears for a few second and then disappears. Below is the project files created by Xcode.


This sample application is small but it's still hard to catch up for the beginner like me so I modified it just to show only the black screen.

2). Delete GameScene.sks and Actions.sks files

3). Modify GameViewController.swift file as following:

import UIKit
import SpriteKit

class GameViewController: UIViewController {

    var scene: GameScene!
    
    override var prefersStatusBarHidden: Bool {
        return true
    }
    
    override func viewDidLoad() {
        super.viewDidLoad()
        
        // 1. Configure the main view
                   let skView = view as! SKView
                   skView.showsFPS = true
        
        // 2. Create and configure our game scene
                   scene = GameScene(size: skView.bounds.size)
        scene.scaleMode = .aspectFill
        
        // 3. Show the scene
        skView.presentScene(scene)
    }

}

4). Modify GameScene.swift file as following:

import SpriteKit

class GameScene: SKScene {
    
    required init?(coder aDecoder: NSCoder) {
        super.init(coder: aDecoder)
    }
    
    override init(size: CGSize) {
        super.init(size: size)
        backgroundColor = SKColor(displayP3Red: 0.0, green: 0.0, blue: 0.0, alpha: 1.0)
    }

}


Concepts 


The difference between the sample game application above and the normal Single View application is the view of the view controller. For a Single View application, the view controller's view is of type UIView. But for a 2D game application, the view must be of type SKView, which presents SpriteKit content or scenes (represented by SKScene objects). 

SKScene class is a descendant of SKNode class so we can think of a scene as a node. SKNode does not draw anything, but it applies its properties to its descendants. A scene builds a block for its contents and acts as a root node for a tree of node objects. The root node applies its properties to its descendants and the contents of its descendants. For example, if a node is rotated, all its descendants are also rotated. 

You may switch between scenes using a single SKView object in your window. You can use SKTransition to animate between two scenes.

In the example below, the scene has 5 nodes such as Sky, Missiles, Body, Rotor1, and Rotor2. Sky is the root node.

The image below shows how those nodes are rendered using zPosition and position properties.


References
1). Book: Beginning Swift Games Development for iOS
2). https://developer.apple.com/documentation/spritekit


Tuesday, July 24, 2018

Building Your First iOS App

The purpose of this post is just to show you how to create a new application in Xcode and explain the project files automatically created by Xcode.

Open Xcode and create a new Single View Application. Then, open the Project Navigator and you'll see the project files created automatically as shown in the image below.


You can run the app on the simulator or an actual device by:
- Select Product > Destination and then select either a simulator or your device connected to the machine
- Select Product > Build
- Select Product > Run


About Project's Files


1). The AppDelegate.swift file defines AppDelegate class which will be executed by the system when you launch your app. This is done by @UIApplicationMain attribute at the top of the file. The attribute is just like calling @UIApplicationMain function and passing your AppDelegate's class name as the name of the delegate class. It might be simpler to explain it using the java code snippets below.

// declaring function
void uiApplicationMain(Class<?> delegateClass) {
   UIApplicationDelegate delegate = delegateClass.newInstance();
   UIApplication application = new UIApplication(delegate);
   
   // may present the delegate.window object
   // and call appropriate application() methods of the delegate
   application.launch(); 
}

// System calls the function
uiApplicationMain(AppDelegate.class);

The AppDelegate class contains the stub implementation of the delegate methods:
  1. func application(_ application: UIApplication, didFinishLaunchingWithOptions launchOptions: [UIApplicationLaunchOptionsKey: Any]?) -> Bool
  2. func applicationWillResignActive(_ application: UIApplication)
  3. func applicationDidEnterBackground(_ application: UIApplication)
  4. func applicationWillEnterForeground(_ application: UIApplication)
  5. func applicationDidBecomeActive(_ application: UIApplication)
  6. func applicationWillTerminate(_ application: UIApplication)

Those stub methods will be called by the application in response to the events. You can add your own codes there to do any actions responded to the events or leave them empty for default behaviors.

2). Assets.xcassets file lets you define the app icons, images used within the app, and other resources. See this post for how to define the app icons.

3). Main.storyboard file is managed by Xcode to make it simple for developers to design the interface of their apps. They just drag and drop the controls needed. Then, Xcode will create necessary Swift or Objective-C classes, configuration and resource files behind the scene. The storyboard represents the screen of content in your app.

4). ViewController.swift file contains the ViewController class corresponding to the view controller you designed in the Main.storyboard file (or Interface  Builder). They're linked together by Class setting under Custom Class section in the Property Inspector. The image below shows how their link is defined.


The ViewController class let you programmatically manage or customize the behavior of your view controller. You can add more view controllers in the Interface Builder and define their corresponding view controller classes in Swift files separately. Each view controller has its own view while the view might have many sub views such as textboxes, buttons, and labels.

5) Info.plist (Information property list file) is the way an app provides its metadata to the system. It is mandatory for the bundled executables (apps, plug-ins, and frameworks). It's encoded using UTF-8 and is structured as XML. See here for more details.


Reference
https://developer.apple.com/library/archive/referencelibrary/GettingStarted/DevelopiOSAppsSwift/BuildABasicUI.html#//apple_ref/doc/uid/TP40015214-CH5-SW1


Sunday, July 22, 2018

Setting Icons for your iOS app in Xcode

You have to specify different image sizes for different device models (iPhone 6, iPad mini, etc) that your app will run on. You even have to specify different image sizes for different areas such as Spotlight and Push Notification. Below is an example of how I configured the app icons in Xcode 9.2.


Steps


1). Click on Assets.xcassets file (which is created by default when you create a new Xcode project) and the Appicon section will show up. Before you set the icons, it would look something like this:

2). Drag the icon images from Finder and drop them on the dotted squares. The icon image for 2x should be 40x40 pixels (40 pixels in width and 40 pixels in height). You calculate it by multiplying 20 by 2. Then, the icon image for 3x should be 60x60 pixels. Note that the icon image should be in PNG format.

Anyway, you can create an icon image with specific size by resizing the original one in Photoshop. You open the image in Photoshop then select Image menu and Image Size... A dialog will pup up and you set the width and height to the desired ones. At last, save it as a new file.

Explanation 


The coordinate system iOS uses to place content on screen based on measurements in points, which map to pixels on display. On the standard-resolution screen, one point is equal to one pixel. The high-resolution screen has higher pixel density because one point is equal to more pixels on the same amount of physical space. For example on iPhone 3's screen, one point (occupied one inch on screen) is equal to 1 pixel. But on iPhone 6's screen, one point (also occupied one inch on screen) is equal to 2 pixels.


With pixel-to-pixel mapping, the old apps made for the older device with lower resolution display would not function correctly on the new device with higher resolution display. The images might look tiny, text might overlap each other, and scrollbar might be thin, for example. Apple came up with the point-to-pixel mapping to solve the problem by scaling up the images and everything. There are a bunch of algorithms for scaling images smoothly. The image below gives you a clue of how an image is scaled.
You create (icon) images based on the device's screens. To accomplish this, you multiply the number of pixels of each image by a specific scale factor. The standard resolution image has a scale factor of 1.0 and is referred to as an @1x image. High resolution images have a scale factor of 2.0 and 3.0 are referred to as @2x and @3x images. Suppose you have a standard resolution @1x image that is 100px x 100px for example. The @2x version of this image would be 200px x 200px. The @3x version of this image would be 300px x 300px.


The 20pt shown in the image in Step1 above means that the size of standard resolution icon image is 20px x 20px.


References
https://developer.apple.com/design/human-interface-guidelines/ios/icons-and-images/app-icon/

Friday, June 15, 2018

My eyes hurt staring at screen using Windows 7 on Macbook Pro

I'm using Macbook Pro 13'' late 2011 and I installed Windows 7 on it. I've got eye strain after staring at the screen for about an hour. Note that i don't have any eye problems with external monitor (matted screen). I switched to different colour profiles such as Apple RGB, but it didn't work.

Surprisingly, Windows 8 on the same machine does not hurt my eyes at all. I guess the workaround is upgrading to Windows 8.